Quick Start
This guide will walk you through developing a simple Agent using the “Basic Agent App” template, and quickly experiencing the full AgentKit workflow from development and deployment to testing. AgentKit provides multiple templates, including basic apps, streaming output, and A2A protocol, and supports both Python and Golang development.
Preparation
1. Obtain Volcengine access keys (AK/SK)
First, you need a Volcengine account and to enable the AgentKit service. Please visit the Volcengine Console to complete registration and activation.
Then, create and obtain access keys (AK/SK) on the Access Control page.
After obtaining them, set them as environment variables:
export VOLCENGINE_ACCESS_KEY=<your_access_key>
export VOLCENGINE_SECRET_KEY=<your_secret_key>
2. Obtain a model inference API Key (Optional)
Your Agent usually needs to call a large language model (LLM) to provide core intelligence. AgentKit Platform supports multiple models from Volcengine Ark. Make sure you have enabled the Volcengine Ark service and obtained the model inference Endpoint and API Key.
Get the inference endpoint (Endpoint): On the Ark platform’s “Online Inference” page, you can select a preset inference endpoint or create a custom inference endpoint.
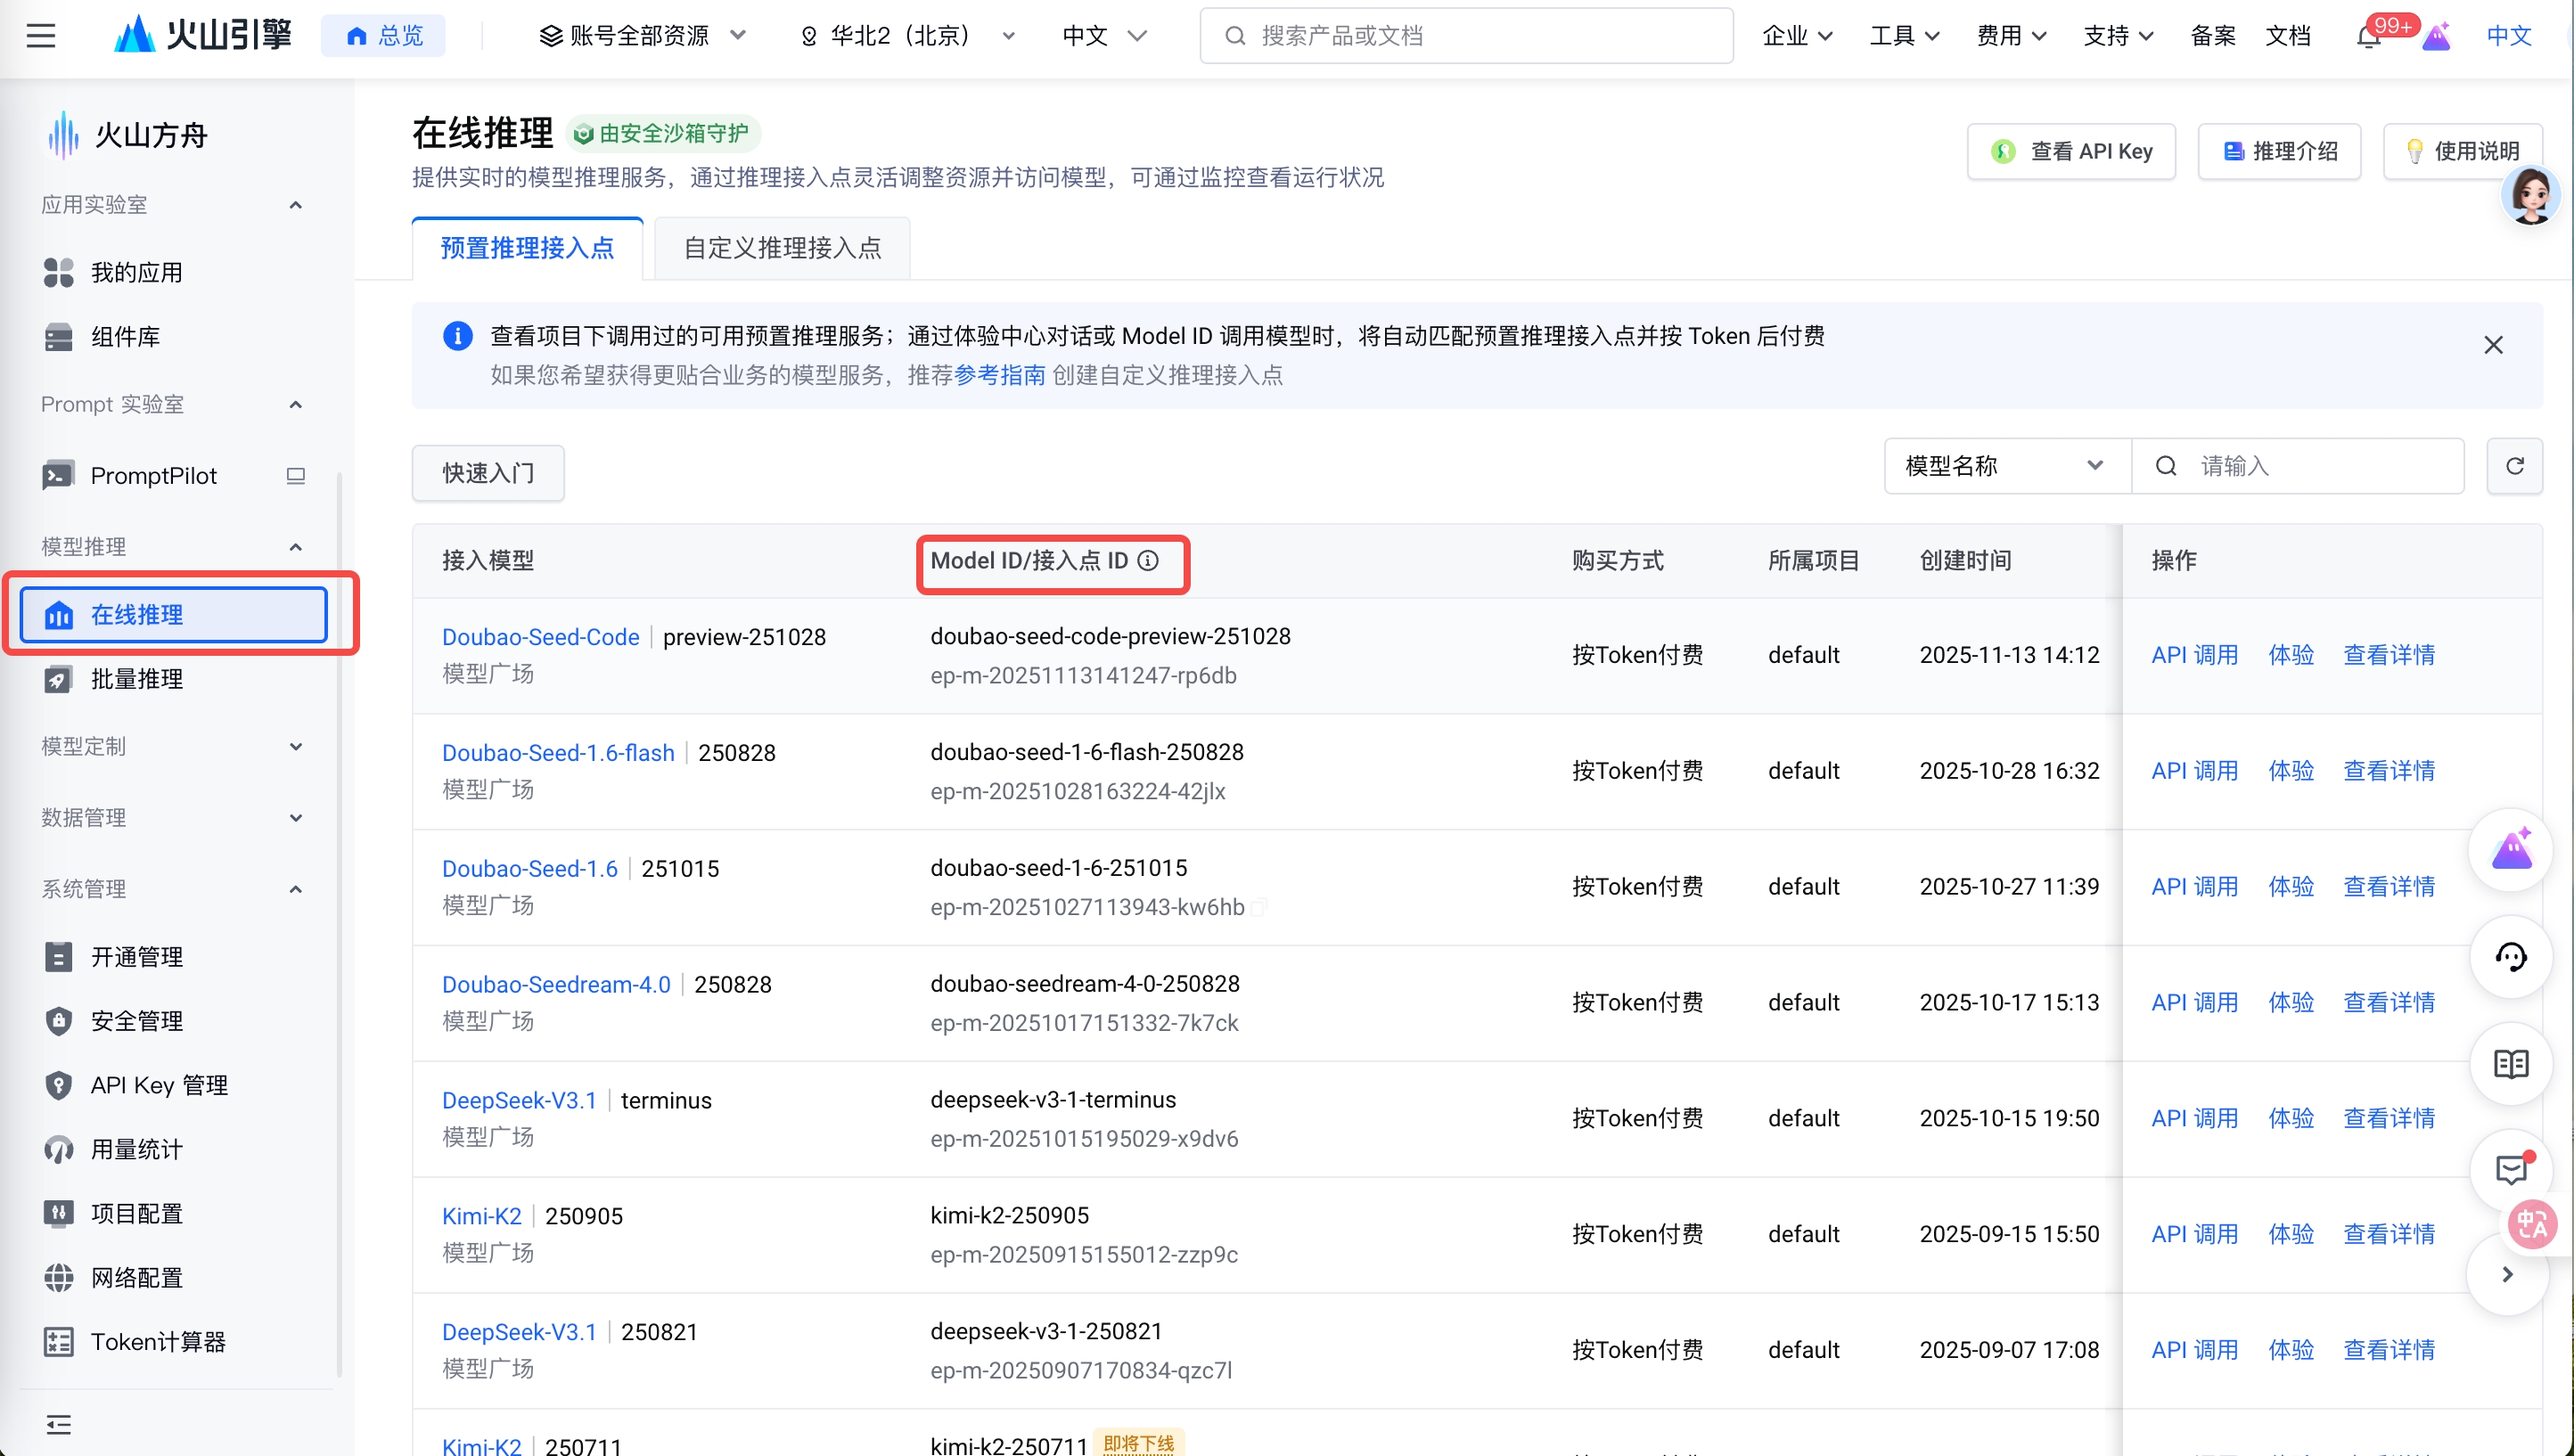
Get the API Key: On the “API Key Management” page, select or create a new API Key.

Please record your Endpoint ID such as ep-20250520174054-xxxxx (it can also be a model ID such as deepseek-v3-1-terminus) and API Key. You will later configure them for the Agent via the environment variables MODEL_AGENT_NAME and MODEL_AGENT_API_KEY.
If you do not provide this information, AgentKit Platform will automatically inject a built-in
doubao-seed-1-6model for you during cloud deployment.
3. Local debugging credential configuration (Required for Local mode)
If you plan to run and debug the Agent locally (Local mode), because the local environment cannot automatically inject cloud credentials, you must configure the access credentials manually; otherwise, the Agent will not be able to call the LLM.
You can configure credentials in one of the following two ways:
Option 1: Configure Ark model credentials
Directly specify the model endpoint and API Key to use:
# Set via --runtime_envs (-e) during config
agentkit config -e MODEL_AGENT_NAME=<your_endpoint_id> -e MODEL_AGENT_API_KEY=<your_api_key>
Option 2: Configure Volcengine access keys
If you configure Volcengine AK/SK, veADK will try to automatically obtain your model access permissions:
# Set via --runtime_envs (-e) during config
agentkit config -e VOLCENGINE_ACCESS_KEY=<your_access_key> -e VOLCENGINE_SECRET_KEY=<your_secret_key>Note:
- In Local mode, directly
exporting environment variables in the host shell does not take effect inside the container. You must useagentkit config -eto write them intoagentkit.yamlunderruntime_envs.- In Cloud mode, the Runtime automatically injects related credentials, and you usually do not need to manually configure the above environment variables.
Getting Started
Step 1: Install AgentKit
Before you begin, ensure you have followed the Install AgentKit guide to complete installation of the agentkit CLI and environment configuration.
Step 2: Initialize a project
Create a project directory and initialize your Agent app using agentkit init:
mkdir simple-agent && cd simple-agent
agentkit init
After running, a list of available templates will be shown. Select template 1 (Basic Agent App). You can also specify a template directly using the --template parameter:
# Use basic template
agentkit init --template basic

# Use streaming output template
agentkit init --template basic_stream

# List all available templates
agentkit init --list-templates
After the command runs, template code and config files will be generated in the current directory:
.
├── agentkit.yaml       # Core configuration file for the Agent.
├── requirements.txt    # Python dependencies for the project.
└── simple_agent.py     # Entry point for the Agent application.
Step 3: Configure and deploy
You can use agentkit launch to build and deploy the app to the cloud in one command. This command uses the configuration in agentkit.yaml.
If you need custom configuration (for example, specify deployment region, image repository, or provide model keys), you can edit agentkit.yaml manually, or run agentkit config to generate configuration through an interactive wizard.
agentkit configThe configuration wizard will guide you to complete the following settings:
General settings (press Enter to use default values):
- 1.App name: Agent app name (default is
simple_agent, press Enter to accept) - 2.Entry file: App entry file (default is
simple_agent.py) - 3.App description: App description (optional)
- 4.Programming language: Python or Golang (default Python)
- 5.Dependency file: default
requirements.txtorgo.mod - 6.Common internal Runtime environment variables for Agent apps:
MODEL_AGENT_NAME: Ark model endpoint ID (optional)MODEL_AGENT_API_KEY: Ark model API Key (optional)
- 7.Deployment mode: choose
cloud(cloud build and deployment)
Cloud deployment settings:
- 1.Service region: default
cn-beijing - 2.Image tag: default
, will be rendered as a timestamp in the format 20251218154940 - 3.CR image repository: CLI will automatically generate the CR instance name, CR namespace, and CR repository name. Users can also specify manually (recommended to keep automatic).
After configuration is complete, run the launch command to deploy with one click:
agentkit launchThis command automatically completes the following steps:
- Render Dockerfile
- Create a project archive and upload it to TOS
- Prepare CR (container image repository) resources
- Create and run a Pipeline build
- Deploy to the Runtime environment
After a successful deployment, you will see output like:
✅ Runtime created successfully: r-ye9j62wydcn****nhsoa, request_id: 20251120***************5344
Waiting for Runtime to be Ready...
💡 Tip: Runtime is initializing, please be patient and do not interrupt the process
✅ Runtime status is Ready
  Runtime status: Releasing ━━━━━━━━━━━━━━━━━━━━━━━━━━━━━━━━━━━━━━━━ 100% 0:01:23
Endpoint: https://sd4fe31poh486****.apigateway-cn-beijing.volceapi.com
100% ▶ Deployment complete
✅ Successfully launched agent: https://sd4fe31poh486npgcaqq0.apigateway-cn-beijing.volceapi.com
Built image: agentkit-cli-21076x****-cn-beijing.cr.volces.com/agentkit/myapp:2025112017****
Endpoint: https://sd4fe31poh486****.apigateway-cn-beijing.volceapi.comTip: The first deployment usually takes about 2–3 minutes. Please be patient.
Use the Agent
Invoke the Agent
Test the Agent with the invoke command:
agentkit invoke "Hello"If you see output similar to the following, congratulations—your first Agent is running successfully!
(agentkit) test@localhost:~/workspace/simple-agent$ agentkit invoke "Hello"
Invoking agent...
Using default headers: {'user_id': 'agentkit_user', 'session_id': 'agentkit_sample_session'}
✅ Invocation successful
📝 Response:
Hello! I am an AI assistant developed by the **** team, specializing in data science (information gathering, data analysis, etc.), document writing (writing multi-chapter articles, in-depth research reports), and software development (creating websites/applications, solving coding problems, etc.).
If you have any specific needs, I'd be happy to help!
Next Steps
Congratulations on completing development and deployment of your first Agent!
Next, you can:
- Explore other app templates (MCP, A2A, etc.)
- Integrate Platform services like Memory, Knowledge, and Tools to build more powerful Agents
- Use commands like
agentkit memory,agentkit knowledge, andagentkit toolsto manage platform services