UI 扩展开发指南
本指南将帮助您基于 VeAIOps 前端架构,快速实现 UI 功能扩展。无论是添加新的企业协同工具支持、接入新的监控系统,还是开发全新的管理页面,本文档都将为您提供完整的开发指导。
前置要求
在开始 UI 扩展开发之前,您需要具备以下知识和环境:
技术栈要求
- React 18+: 熟悉 React Hooks、组件化开发
- TypeScript 5+: 掌握 TypeScript 类型系统
- Modern.js: 了解现代化的 Web 框架
- pnpm: 包管理工具
- Nx Workspace: Monorepo 管理工具
开发环境
# Node.js 版本
node >= 18.0.0

# pnpm 版本
pnpm >= 8.0.0

# 推荐使用的编辑器
VSCode + TypeScript Extension
项目结构概览
VeAIOps 前端采用 Nx Workspace Monorepo 架构,代码组织清晰,便于扩展和维护。
核心目录结构
frontend/
├── apps/                                    # 应用目录
│   └── veaiops/                            # 主应用
│       ├── src/
│       │   ├── modules/                    # 业务模块(按领域划分)
│       │   │   ├── system/                 # 系统配置模块
│       │   │   │   └── features/           # 功能特性
│       │   │   │       ├── bot/            # 机器人管理
│       │   │   │       ├── datasource/     # 数据源管理
│       │   │   │       ├── account/        # 账号管理
│       │   │   │       └── ...             # 其他功能
│       │   │   ├── event-center/           # 事件中心模块
│       │   │   └── threshold/              # 智能阈值模块
│       │   ├── pages/                      # 页面入口
│       │   ├── components/                 # 应用级组件
│       │   ├── config/                     # 配置文件
│       │   └── ...
│       └── package.json
├── packages/                               # 共享包
│   ├── components/                         # UI 组件库 ⭐
│   ├── hooks/                              # 共享 Hooks
│   ├── types/                              # 类型定义
│   ├── utils/                              # 工具函数
│   └── constants/                          # 常量定义
├── nx.json                                 # Nx 配置
├── tsconfig.base.json                      # TypeScript 配置
└── package.json
模块化架构
VeAIOps 采用 Feature-Based 模块化架构,每个功能特性(Feature)都遵循统一的目录结构:
features/[feature-name]/
├── hooks/                          # 业务逻辑 Hooks
│   ├── use-xxx-logic.ts           # 主业务逻辑
│   ├── use-xxx-table-config.ts    # 表格配置
│   └── index.ts
├── lib/                            # 工具和配置
│   ├── api.ts                     # API 调用
│   ├── types.ts                   # 类型定义
│   ├── constants.ts               # 常量
│   ├── columns.tsx                # 表格列配置
│   ├── filters.ts                 # 筛选器配置
│   └── index.ts
├── ui/                             # UI 组件
│   ├── components/                # 子组件
│   ├── xxx-management.tsx         # 主页面
│   ├── xxx-table.tsx              # 表格组件
│   ├── xxx-modal.tsx              # 弹窗组件
│   └── index.ts
├── types/                          # 类型定义(可选)
└── index.ts                        # 统一导出
Quick Start: 实战案例 - 添加新的数据源支持
本节将以添加 Prometheus 数据源为例,演示从后端 API 到前端 UI 的完整扩展流程。
场景说明
假设我们需要在 VeAIOps 中添加 Prometheus 监控数据源的支持,用户可以通过 UI 界面配置 Prometheus 连接,并查看相关指标。
最终效果预览:
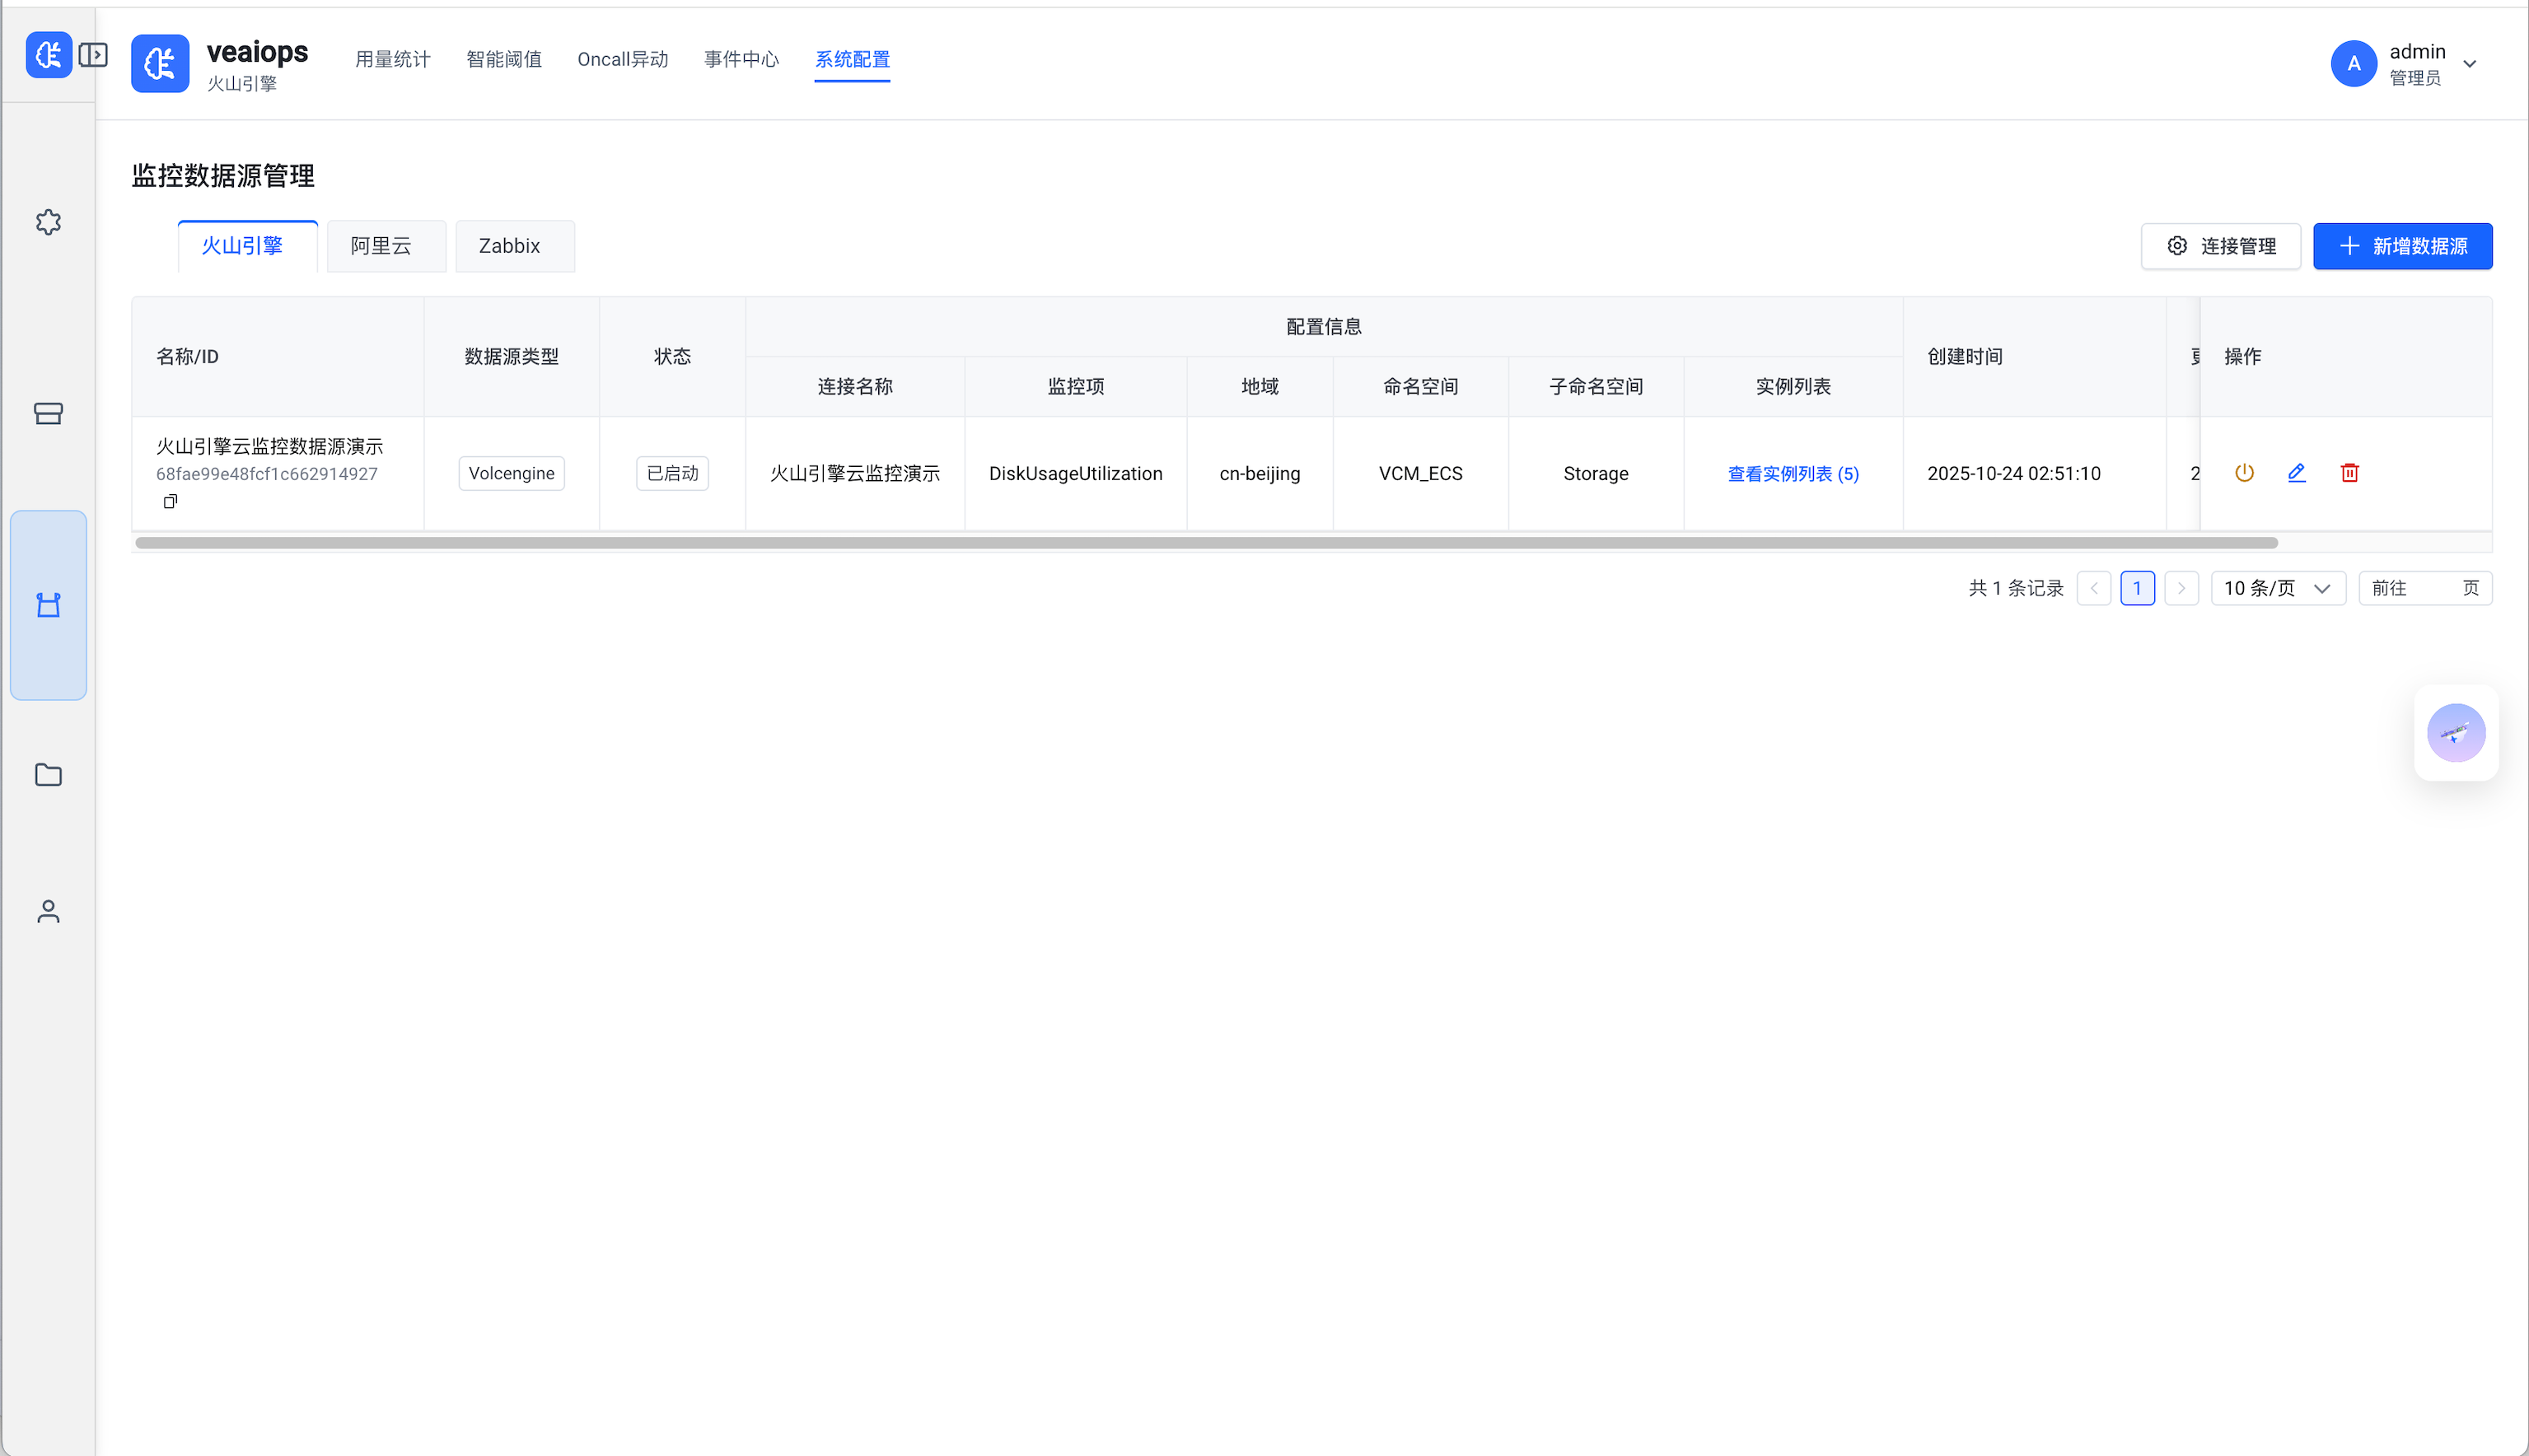
如上图所示,用户可以在数据源管理页面查看所有配置的数据源,包括数据源名称、类型、配置信息等。
后端准备
在开始前端开发之前,确保后端已经实现了相关 API:
from veaiops.metrics.base import DataSource

class PrometheusDataSource(DataSource):
    """Prometheus 数据源实现"""

    async def _fetch_one_slot(self, start_time, end_time):
        # 实现数据获取逻辑
        pass
前端实现步骤
完整的开发流程包括以下步骤:
步骤 1: 定义 OpenAPI Spec
首先在 frontend/packages/openapi-specs/src/specs/modules/ 目录下创建 prometheus.json:
{
  "openapi": "3.0.0",
  "info": {
    "title": "Prometheus API",
    "version": "1.0.0",
    "description": "Prometheus 数据源管理接口"
  },
  "paths": {
    "/apis/v1/datasource/prometheus/": {
      "get": {
        "summary": "Get All Prometheus Datasources",
        "tags": ["Data Sources"],
        "parameters": [
          {
            "name": "skip",
            "in": "query",
            "schema": { "type": "integer", "default": 0 }
          },
          {
            "name": "limit",
            "in": "query",
            "schema": { "type": "integer", "default": 100 }
          }
        ],
        "responses": {
          "200": {
            "description": "Success",
            "content": {
              "application/json": {
                "schema": {
                  "type": "object",
                  "properties": {
                    "items": {
                      "type": "array",
                      "items": { "$ref": "#/components/schemas/PrometheusDataSource" }
                    },
                    "total": { "type": "integer" }
                  }
                }
              }
            }
          }
        }
      }
    }
  },
  "components": {
    "schemas": {
      "PrometheusDataSource": {
        "type": "object",
        "properties": {
          "_id": { "type": "string" },
          "name": { "type": "string" },
          "prometheus_config": {
            "type": "object",
            "properties": {
              "server_url": { "type": "string" },
              "query_timeout": { "type": "integer" }
            }
          }
        }
      }
    }
  }
}
步骤 2: 生成 API 代码
运行生成命令:
cd frontend
pnpm generate:api
这将在 frontend/apps/veaiops/api-generate/ 目录下生成:
models/PrometheusDataSource.ts- 类型定义services/DataSourcesService.ts- API 服务类
步骤 3: 创建 Feature 目录
cd frontend/apps/veaiops/src/modules/system/features/
mkdir -p prometheus/{hooks,lib,ui,types}
步骤 4: 定义类型和常量
api-generate 中的类型,无需重复定义。/**
* Prometheus 数据源配置
*/
export interface PrometheusDataSource {
_id: string;
name: string;
type: 'Prometheus';
is_active: boolean;
prometheus_config: {
server_url: string;
query_timeout?: number;
basic_auth?: {
username: string;
password: string;
};
};
description?: string;
created_at: string;
updated_at: string;
}
/**
* Prometheus 表单数据
*/
export interface PrometheusFormData {
name: string;
server_url: string;
query_timeout?: number;
username?: string;
password?: string;
description?: string;
}
/**
 * 默认配置
 */
export const DEFAULT_QUERY_TIMEOUT = 30; // 秒

/**
 * 表单验证规则
 */
export const VALIDATION_RULES = {
  server_url: {
    required: true,
    pattern: /^https?:\/\/.+/,
    message: '请输入有效的 URL',
  },
  name: {
    required: true,
    message: '请输入数据源名称',
  },
};
步骤 5: 使用生成的 API 代码
直接使用 api-generate 中生成的 API 服务:
import { DataSourcesService } from 'api-generate';
import type { PrometheusDataSource } from 'api-generate';

/**
 * 获取 Prometheus 数据源列表
 */
export const getPrometheusDataSources = async (params: {
  skip?: number;
  limit?: number;
  name?: string;
}) => {
  // 直接使用生成的服务,包含完整的类型支持
  const response = await DataSourcesService.getAllPrometheusDatasources({
    skip: params.skip,
    limit: params.limit,
    name: params.name,
  });

  return {
    data: response.items || [],
    total: response.total || 0,
    success: true,
  };
};

/**
 * 创建 Prometheus 数据源
 */
export const createPrometheusDataSource = async (data: {
  name: string;
  server_url: string;
  query_timeout?: number;
  description?: string;
}) => {
  return await DataSourcesService.createPrometheusDatasource({
    requestBody: {
      type: 'Prometheus',
      name: data.name,
      description: data.description,
      prometheus_config: {
        server_url: data.server_url,
        query_timeout: data.query_timeout || 30,
      },
    },
  });
};

/**
 * 删除 Prometheus 数据源
 */
export const deletePrometheusDataSource = async (id: string) => {
  return await DataSourcesService.deletePrometheusDatasource({ id });
};

/**
 * 测试 Prometheus 连接
 */
export const testPrometheusConnection = async (id: string) => {
  return await DataSourcesService.testPrometheusDatasource({ id });
};
步骤 6: 配置表格列
import { Button, Tag, Space, Popconfirm } from '@arco-design/web-react';
import { IconEdit, IconDelete, IconLink } from '@arco-design/web-react/icon';
import type { ColumnProps } from '@arco-design/web-react/es/Table';
import { CellRender } from '@veaiops/components';
import type { PrometheusDataSource } from './types';

interface ColumnsProps {
  onEdit: (record: PrometheusDataSource) => void;
  onDelete: (id: string) => Promise<void>;
  onTest: (record: PrometheusDataSource) => void;
}

export const getPrometheusColumns = ({
  onEdit,
  onDelete,
  onTest,
}: ColumnsProps): ColumnProps<PrometheusDataSource>[] => [
  {
    title: '数据源名称',
    dataIndex: 'name',
    key: 'name',
    fixed: 'left' as const,
    width: 200,
    render: (name: string, record: PrometheusDataSource) => (
      <CellRender.InfoWithCode name={name} code={record._id} />
    ),
  },
  {
    title: 'Prometheus 地址',
    dataIndex: ['prometheus_config', 'server_url'],
    key: 'server_url',
    width: 300,
    render: (url: string) => <CellRender.Ellipsis text={url} />,
  },
  {
    title: '查询超时',
    dataIndex: ['prometheus_config', 'query_timeout'],
    key: 'query_timeout',
    width: 120,
    render: (timeout: number) => `${timeout || 30}s`,
  },
  {
    title: '认证方式',
    dataIndex: ['prometheus_config', 'basic_auth'],
    key: 'auth',
    width: 120,
    render: (auth: any) => (
      <Tag color={auth ? 'green' : 'gray'}>
        {auth ? 'Basic Auth' : '无认证'}
      </Tag>
    ),
  },
  {
    title: '描述',
    dataIndex: 'description',
    key: 'description',
    width: 200,
    render: (desc: string) => <CellRender.Ellipsis text={desc || '-'} />,
  },
  {
    title: '创建时间',
    dataIndex: 'created_at',
    key: 'created_at',
    width: 180,
    render: (time: string) => <CellRender.StampTime time={time} />,
  },
  {
    title: '操作',
    key: 'actions',
    fixed: 'right' as const,
    width: 200,
    render: (_: any, record: PrometheusDataSource) => (
      <Space size="small">
        <Button
          type="text"
          size="small"
          icon={<IconLink />}
          onClick={() => onTest(record)}
        >
          测试连接
        </Button>
        <Button
          type="text"
          size="small"
          icon={<IconEdit />}
          onClick={() => onEdit(record)}
        >
          编辑
        </Button>
        <Popconfirm
          title="确定要删除这个数据源吗?"
          onOk={() => onDelete(record._id)}
        >
          <Button type="text" size="small" status="danger" icon={<IconDelete />}>
            删除
          </Button>
        </Popconfirm>
      </Space>
    ),
  },
];
步骤 7: 配置筛选器
import type { FilterConfig } from '@veaiops/components';

export const prometheusFilters: FilterConfig[] = [
  {
    field: 'name',
    label: '数据源名称',
    type: 'Input',
    componentProps: {
      placeholder: '请输入数据源名称',
      allowClear: true,
    },
  },
  {
    field: 'server_url',
    label: 'Prometheus 地址',
    type: 'Input',
    componentProps: {
      placeholder: '请输入 Prometheus 地址',
      allowClear: true,
    },
  },
];
步骤 8: 创建表格配置 Hook
import { useCallback } from 'react';
import { useBusinessTable } from '@veaiops/components';
import { Message } from '@arco-design/web-react';
import {
  getPrometheusDataSources,
  deletePrometheusDataSource,
} from '../lib/api';
import { getPrometheusColumns } from '../lib/columns';
import type { PrometheusDataSource } from '../lib/types';

export const usePrometheusTableConfig = ({
  onEdit,
  onTest,
}: {
  onEdit: (record: PrometheusDataSource) => void;
  onTest: (record: PrometheusDataSource) => void;
}) => {
  const request = useCallback(
    async (params: { current: number; pageSize: number; [key: string]: any }) => {
      const { current, pageSize, ...filters } = params;

      const response = await getPrometheusDataSources({
        skip: (current - 1) * pageSize,
        limit: pageSize,
        ...filters,
      });

      return {
        data: response.data,
        total: response.total || 0,
        success: true,
      };
    },
    [],
  );

  const handleDelete = useCallback(async (id: string) => {
    try {
      await deletePrometheusDataSource(id);
      Message.success('删除成功');
      return true;
    } catch (error) {
      Message.error('删除失败');
      return false;
    }
  }, []);

  const { customTableProps } = useBusinessTable({
    dataSource: { request },
    handlers: { delete: handleDelete },
    refreshConfig: {
      enableRefreshFeedback: true,
    },
  });

  const columns = useCallback(
    () => getPrometheusColumns({ onEdit, onDelete: handleDelete, onTest }),
    [onEdit, handleDelete, onTest],
  );

  return {
    ...customTableProps,
    handleColumns: columns,
  };
};
步骤 9: 创建业务逻辑 Hook
import { useState, useCallback } from 'react';
import { Form, Message } from '@arco-design/web-react';
import {
  createPrometheusDataSource,
  updatePrometheusDataSource,
  testPrometheusConnection,
} from '../lib/api';
import type { PrometheusDataSource, PrometheusFormData } from '../lib/types';

export const usePrometheusLogic = (refreshTable?: () => void) => {
  const [form] = Form.useForm();
  const [modalVisible, setModalVisible] = useState(false);
  const [editingDataSource, setEditingDataSource] =
    useState<PrometheusDataSource | null>(null);
  const [loading, setLoading] = useState(false);
  const [testing, setTesting] = useState(false);

  const handleAdd = useCallback(() => {
    setEditingDataSource(null);
    form.resetFields();
    setModalVisible(true);
  }, [form]);

  const handleEdit = useCallback(
    (record: PrometheusDataSource) => {
      setEditingDataSource(record);
      form.setFieldsValue({
        name: record.name,
        server_url: record.prometheus_config.server_url,
        query_timeout: record.prometheus_config.query_timeout,
        username: record.prometheus_config.basic_auth?.username,
        description: record.description,
      });
      setModalVisible(true);
    },
    [form],
  );

  const handleCancel = useCallback(() => {
    setModalVisible(false);
    setEditingDataSource(null);
    form.resetFields();
  }, [form]);

  const handleSubmit = useCallback(
    async (values: PrometheusFormData) => {
      setLoading(true);
      try {
        if (editingDataSource) {
          await updatePrometheusDataSource(editingDataSource._id, values);
          Message.success('更新成功');
        } else {
          await createPrometheusDataSource(values);
          Message.success('创建成功');
        }
        handleCancel();
        refreshTable?.();
      } catch (error) {
        Message.error(editingDataSource ? '更新失败' : '创建失败');
      } finally {
        setLoading(false);
      }
    },
    [editingDataSource, handleCancel, refreshTable],
  );

  const handleTest = useCallback(
    async (record: PrometheusDataSource) => {
      setTesting(true);
      try {
        const result = await testPrometheusConnection({
          server_url: record.prometheus_config.server_url,
          username: record.prometheus_config.basic_auth?.username,
          password: '', // 不传密码,使用已保存的
        });

        if (result.success) {
          Message.success('连接测试成功');
        } else {
          Message.error(`连接测试失败: ${result.message}`);
        }
      } catch (error) {
        Message.error('连接测试失败');
      } finally {
        setTesting(false);
      }
    },
    [],
  );

  return {
    modalVisible,
    editingDataSource,
    form,
    loading,
    testing,
    handleAdd,
    handleEdit,
    handleCancel,
    handleSubmit,
    handleTest,
  };
};
步骤 10: 创建 UI 组件
import { forwardRef } from 'react';
import { CustomTable, Filters } from '@veaiops/components';
import { Button, Card } from '@arco-design/web-react';
import { IconPlus } from '@arco-design/web-react/icon';
import { usePrometheusTableConfig } from '../hooks';
import { prometheusFilters } from '../lib/filters';
import type { PrometheusDataSource } from '../lib/types';

interface PrometheusTableProps {
  onEdit: (record: PrometheusDataSource) => void;
  onAdd: () => void;
  onTest: (record: PrometheusDataSource) => void;
}

export const PrometheusTable = forwardRef<any, PrometheusTableProps>(
  (props, ref) => {
    const { onEdit, onAdd, onTest } = props;

    const tableConfig = usePrometheusTableConfig({ onEdit, onTest });

    return (
      <Card
        title="Prometheus 数据源管理"
        extra={
          <Button type="primary" icon={<IconPlus />} onClick={onAdd}>
            新增数据源
          </Button>
        }
      >
        <Filters config={prometheusFilters} showReset />
        <CustomTable
          {...tableConfig}
          ref={ref}
          rowKey="_id"
          scroll={{ x: 1400 }}
        />
      </Card>
    );
  },
);

PrometheusTable.displayName = 'PrometheusTable';
import {
  Modal,
  Form,
  Input,
  InputNumber,
  TextArea,
} from '@arco-design/web-react';
import type { FormInstance } from '@arco-design/web-react';
import { VALIDATION_RULES, DEFAULT_QUERY_TIMEOUT } from '../lib/constants';
import type { PrometheusFormData } from '../lib/types';

interface PrometheusModalProps {
  visible: boolean;
  form: FormInstance;
  loading: boolean;
  isEdit: boolean;
  onCancel: () => void;
  onSubmit: (values: PrometheusFormData) => void;
}

export const PrometheusModal = ({
  visible,
  form,
  loading,
  isEdit,
  onCancel,
  onSubmit,
}: PrometheusModalProps) => {
  return (
    <Modal
      title={isEdit ? '编辑 Prometheus 数据源' : '新增 Prometheus 数据源'}
      visible={visible}
      onOk={() => form.submit()}
      onCancel={onCancel}
      confirmLoading={loading}
      maskClosable={false}
    >
      <Form
        form={form}
        layout="vertical"
        onSubmit={onSubmit}
        autoComplete="off"
      >
        <Form.Item
          label="数据源名称"
          field="name"
          rules={[VALIDATION_RULES.name]}
        >
          <Input placeholder="请输入数据源名称" />
        </Form.Item>

        <Form.Item
          label="Prometheus 服务地址"
          field="server_url"
          rules={[VALIDATION_RULES.server_url]}
        >
          <Input placeholder="http://prometheus.example.com:9090" />
        </Form.Item>

        <Form.Item
          label="查询超时时间 (秒)"
          field="query_timeout"
          initialValue={DEFAULT_QUERY_TIMEOUT}
        >
          <InputNumber
            placeholder="请输入超时时间"
            min={1}
            max={300}
            style={{ width: '100%' }}
          />
        </Form.Item>

        <Form.Item label="用户名 (可选)" field="username">
          <Input placeholder="Basic Auth 用户名" />
        </Form.Item>

        <Form.Item label="密码 (可选)" field="password">
          <Input.Password placeholder="Basic Auth 密码" />
        </Form.Item>

        <Form.Item label="描述" field="description">
          <TextArea
            placeholder="请输入数据源描述"
            rows={3}
            maxLength={200}
            showWordLimit
          />
        </Form.Item>
      </Form>
    </Modal>
  );
};
import { useRef } from 'react';
import { PrometheusTable } from './prometheus-table';
import { PrometheusModal } from './prometheus-modal';
import { usePrometheusLogic } from '../hooks';

export const PrometheusManagement = () => {
  const tableRef = useRef<any>(null);

  const {
    modalVisible,
    editingDataSource,
    form,
    loading,
    handleAdd,
    handleEdit,
    handleCancel,
    handleSubmit,
    handleTest,
  } = usePrometheusLogic(() => tableRef.current?.refresh());

  return (
    <>
      <PrometheusTable
        ref={tableRef}
        onAdd={handleAdd}
        onEdit={handleEdit}
        onTest={handleTest}
      />
      <PrometheusModal
        visible={modalVisible}
        form={form}
        loading={loading}
        isEdit={!!editingDataSource}
        onCancel={handleCancel}
        onSubmit={handleSubmit}
      />
    </>
  );
};

export default PrometheusManagement;
步骤 11: 统一导出
export { PrometheusManagement } from './ui';
export * from './hooks';
export * from './lib/types';
export * from './lib/constants';
步骤 12: 配置路由和页面
import { lazy } from 'react';

const PrometheusManagement = lazy(
  () => import('@/modules/system/features/prometheus/ui/prometheus-management'),
);

const PrometheusPage = () => {
  return <PrometheusManagement />;
};

export default PrometheusPage;
更新路由配置:
export const systemRoutes = [
  // ... 其他路由
  {
    path: '/system/datasource/prometheus',
    element: React.createElement(pageConfig.system.Prometheus),
    title: 'Prometheus 数据源',
    requireAuth: true,
  },
];
最终效果展示
完成以上步骤后,您将获得一个功能完整的数据源管理系统。
数据源列表页面
如上图所示,数据源列表页面包含:
- ✅ 数据源列表展示
- ✅ 筛选和分页功能
- ✅ 操作按钮(编辑、删除、测试连接)
连接配置页面
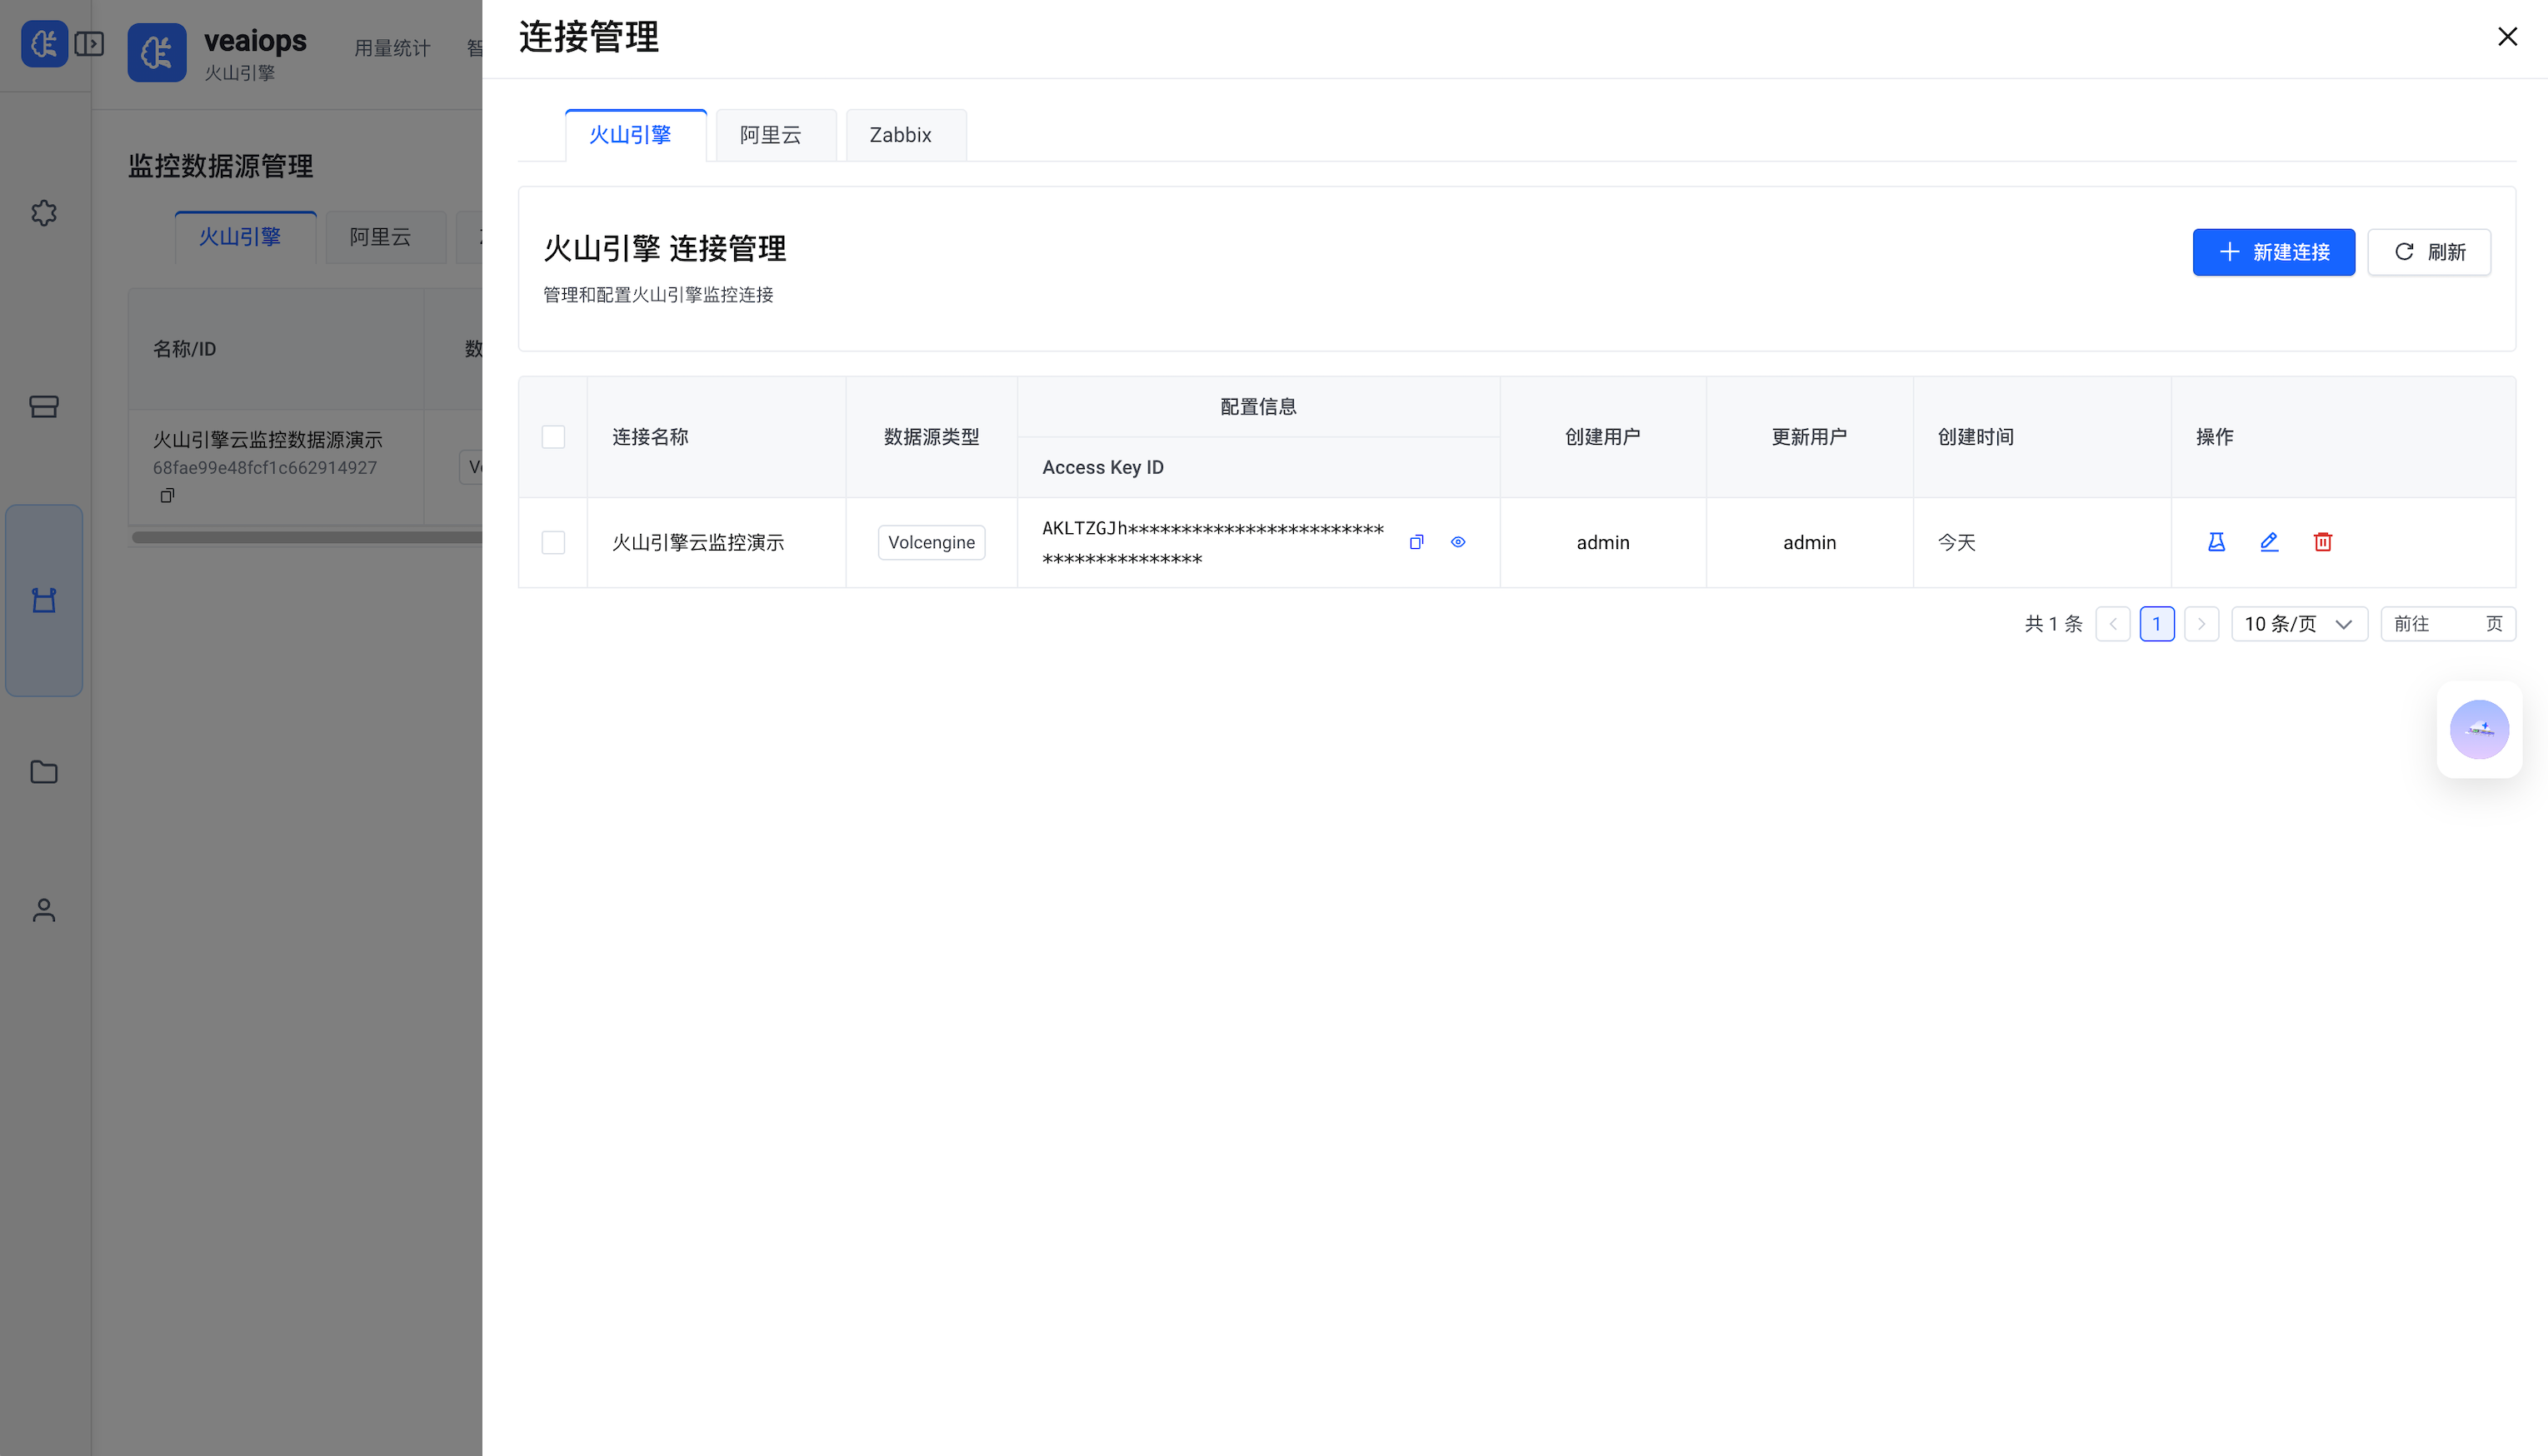
连接管理页面支持:
- ✅ 多种数据源类型
- ✅ 安全的凭证管理
- ✅ 连接测试功能
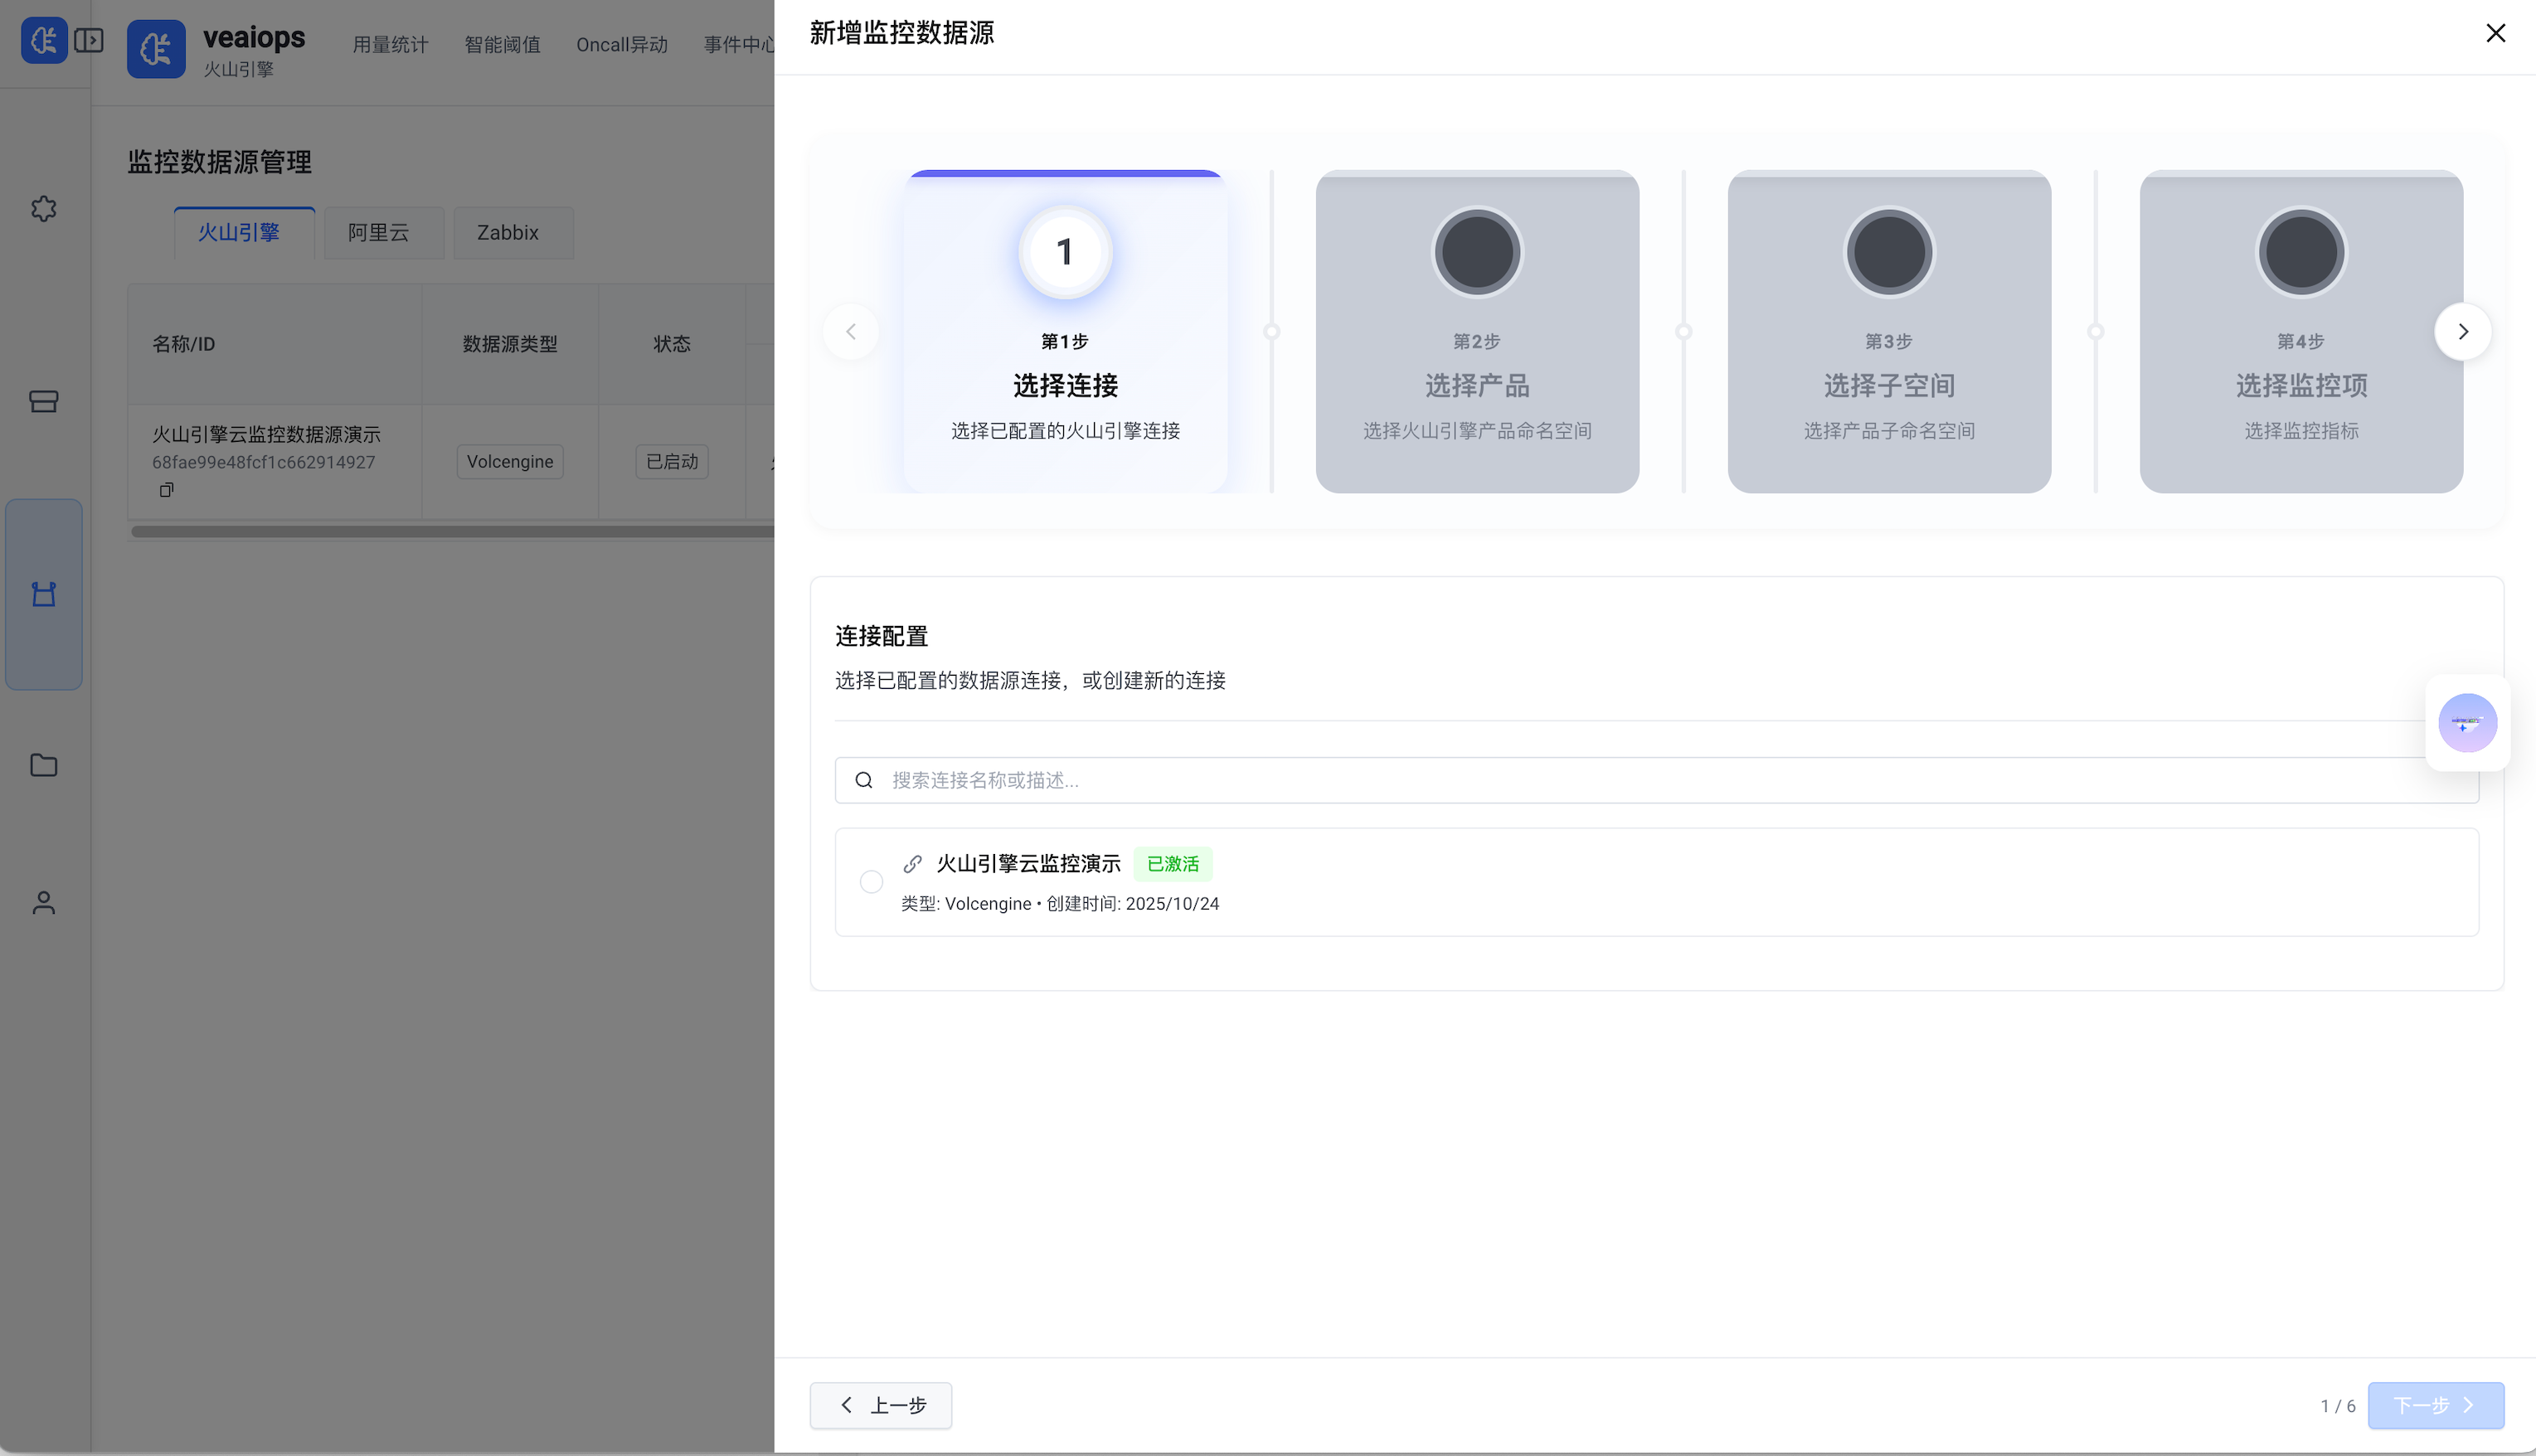
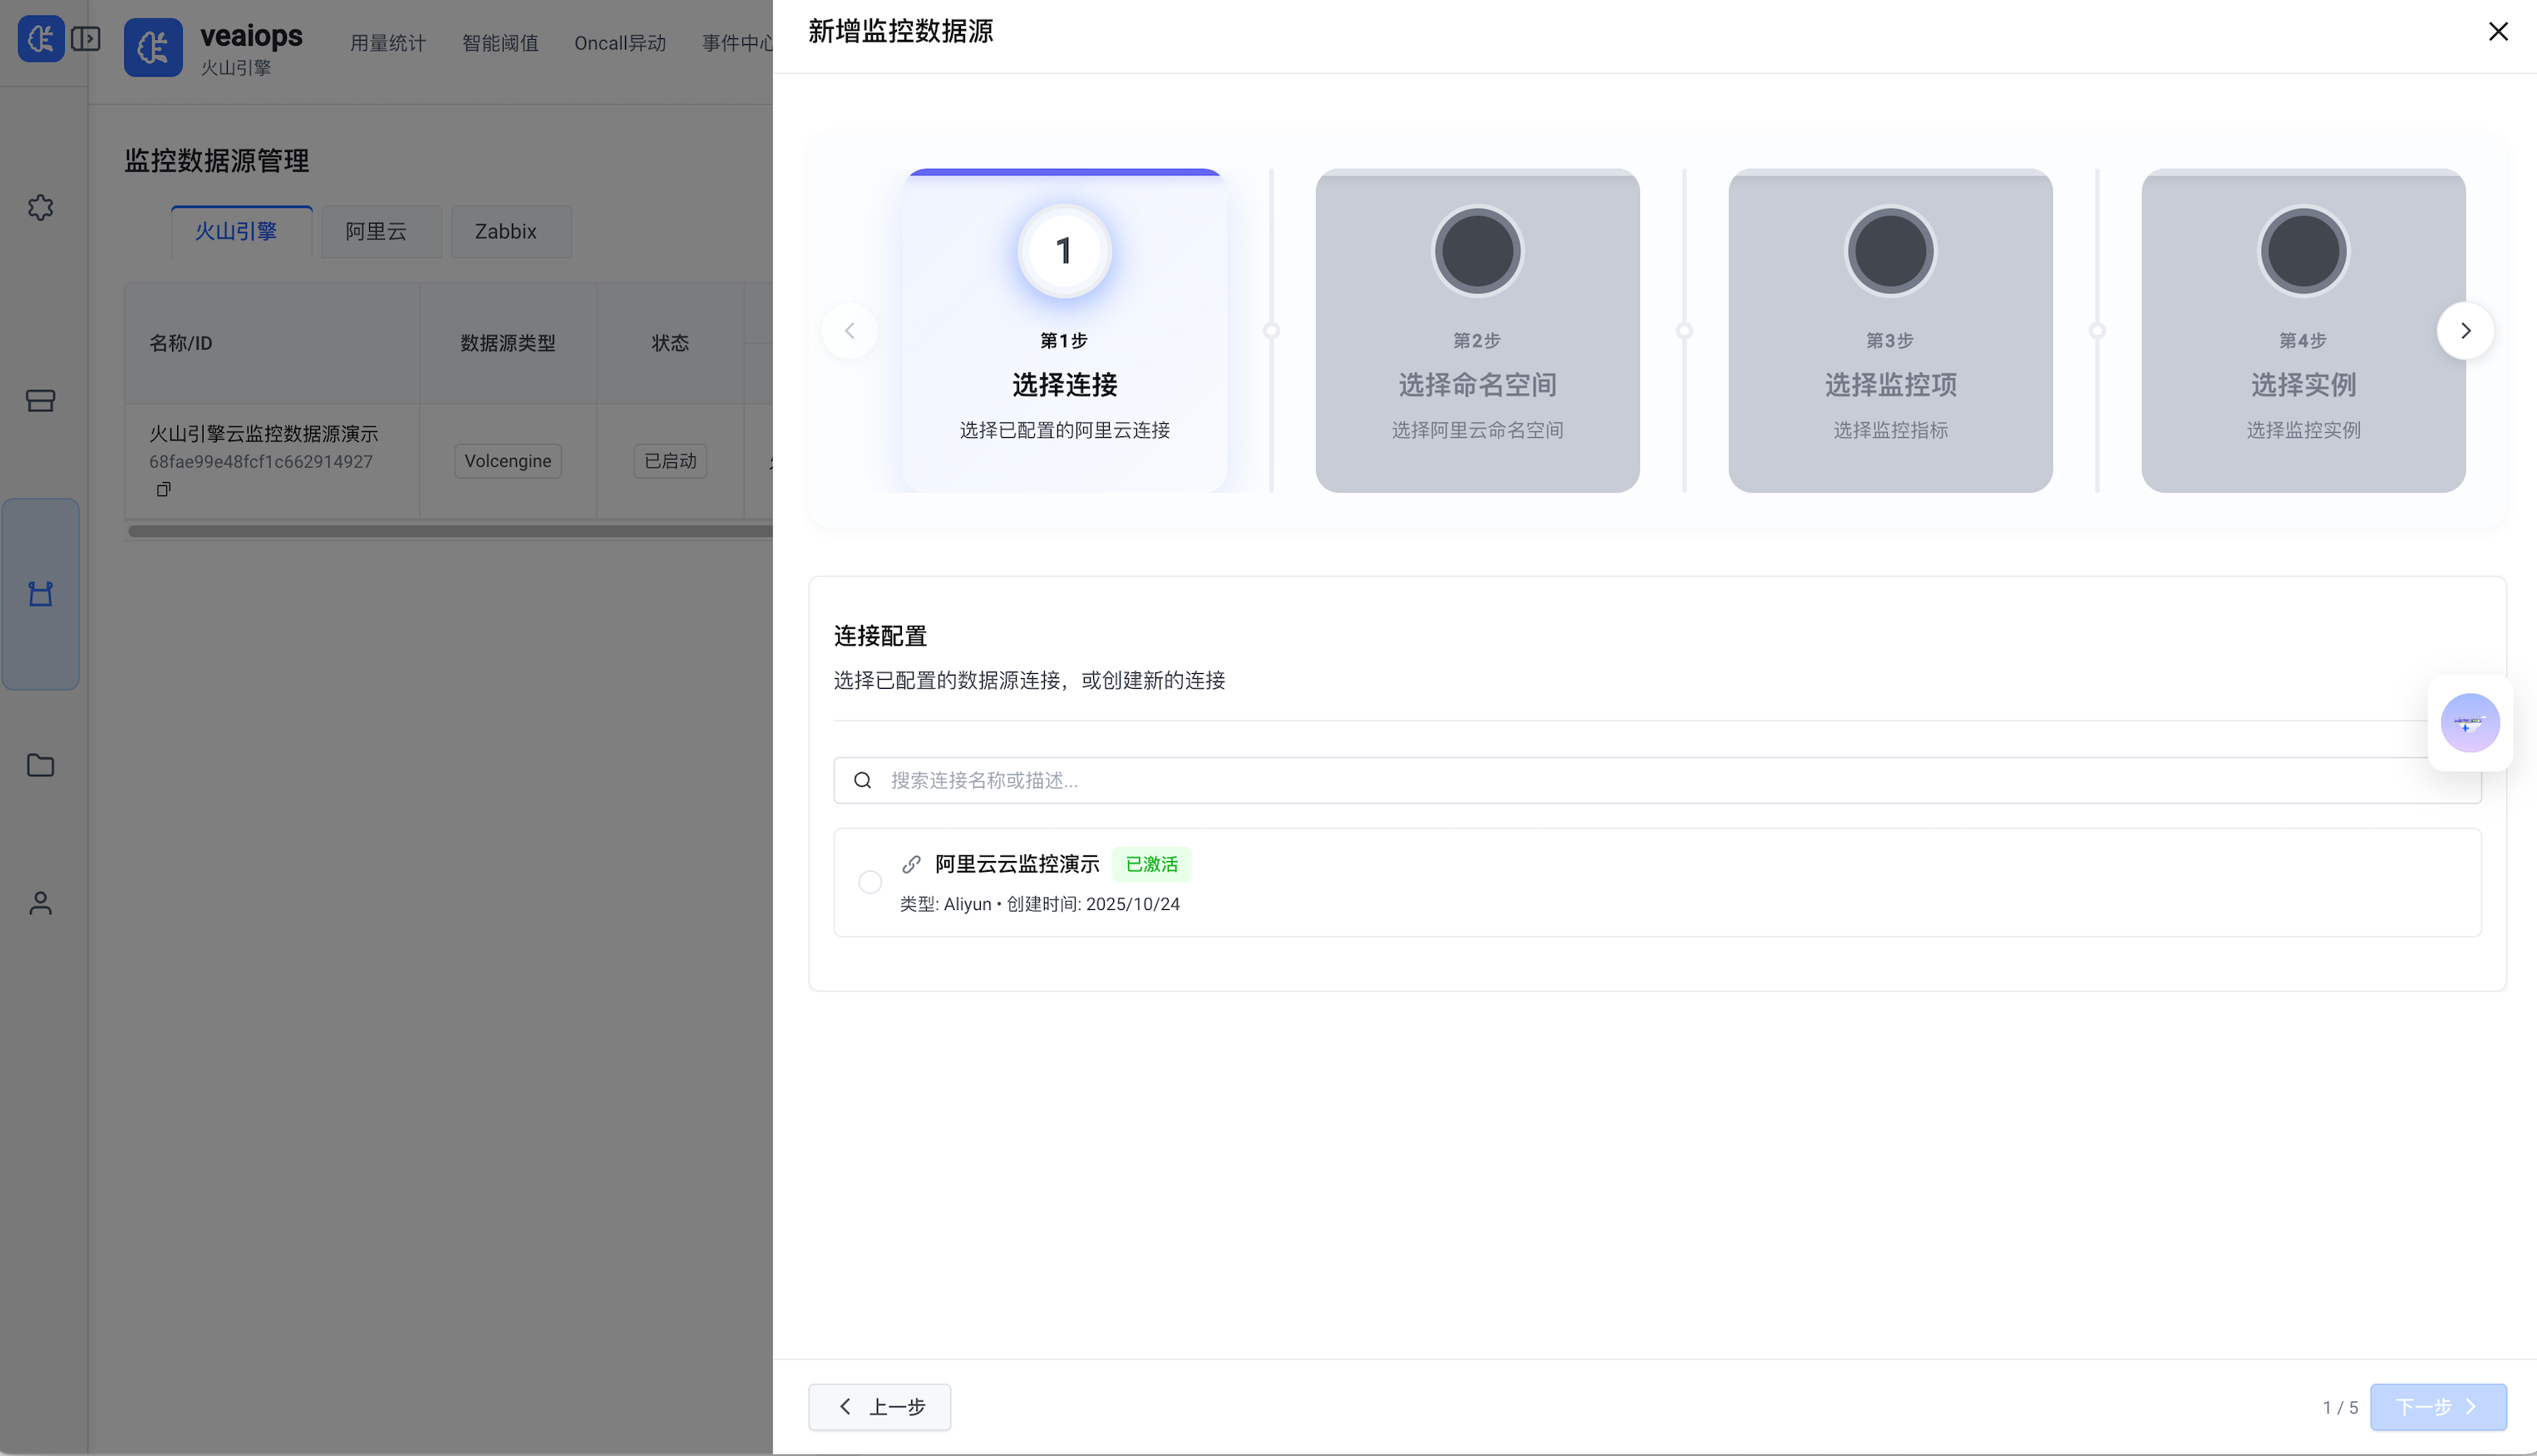
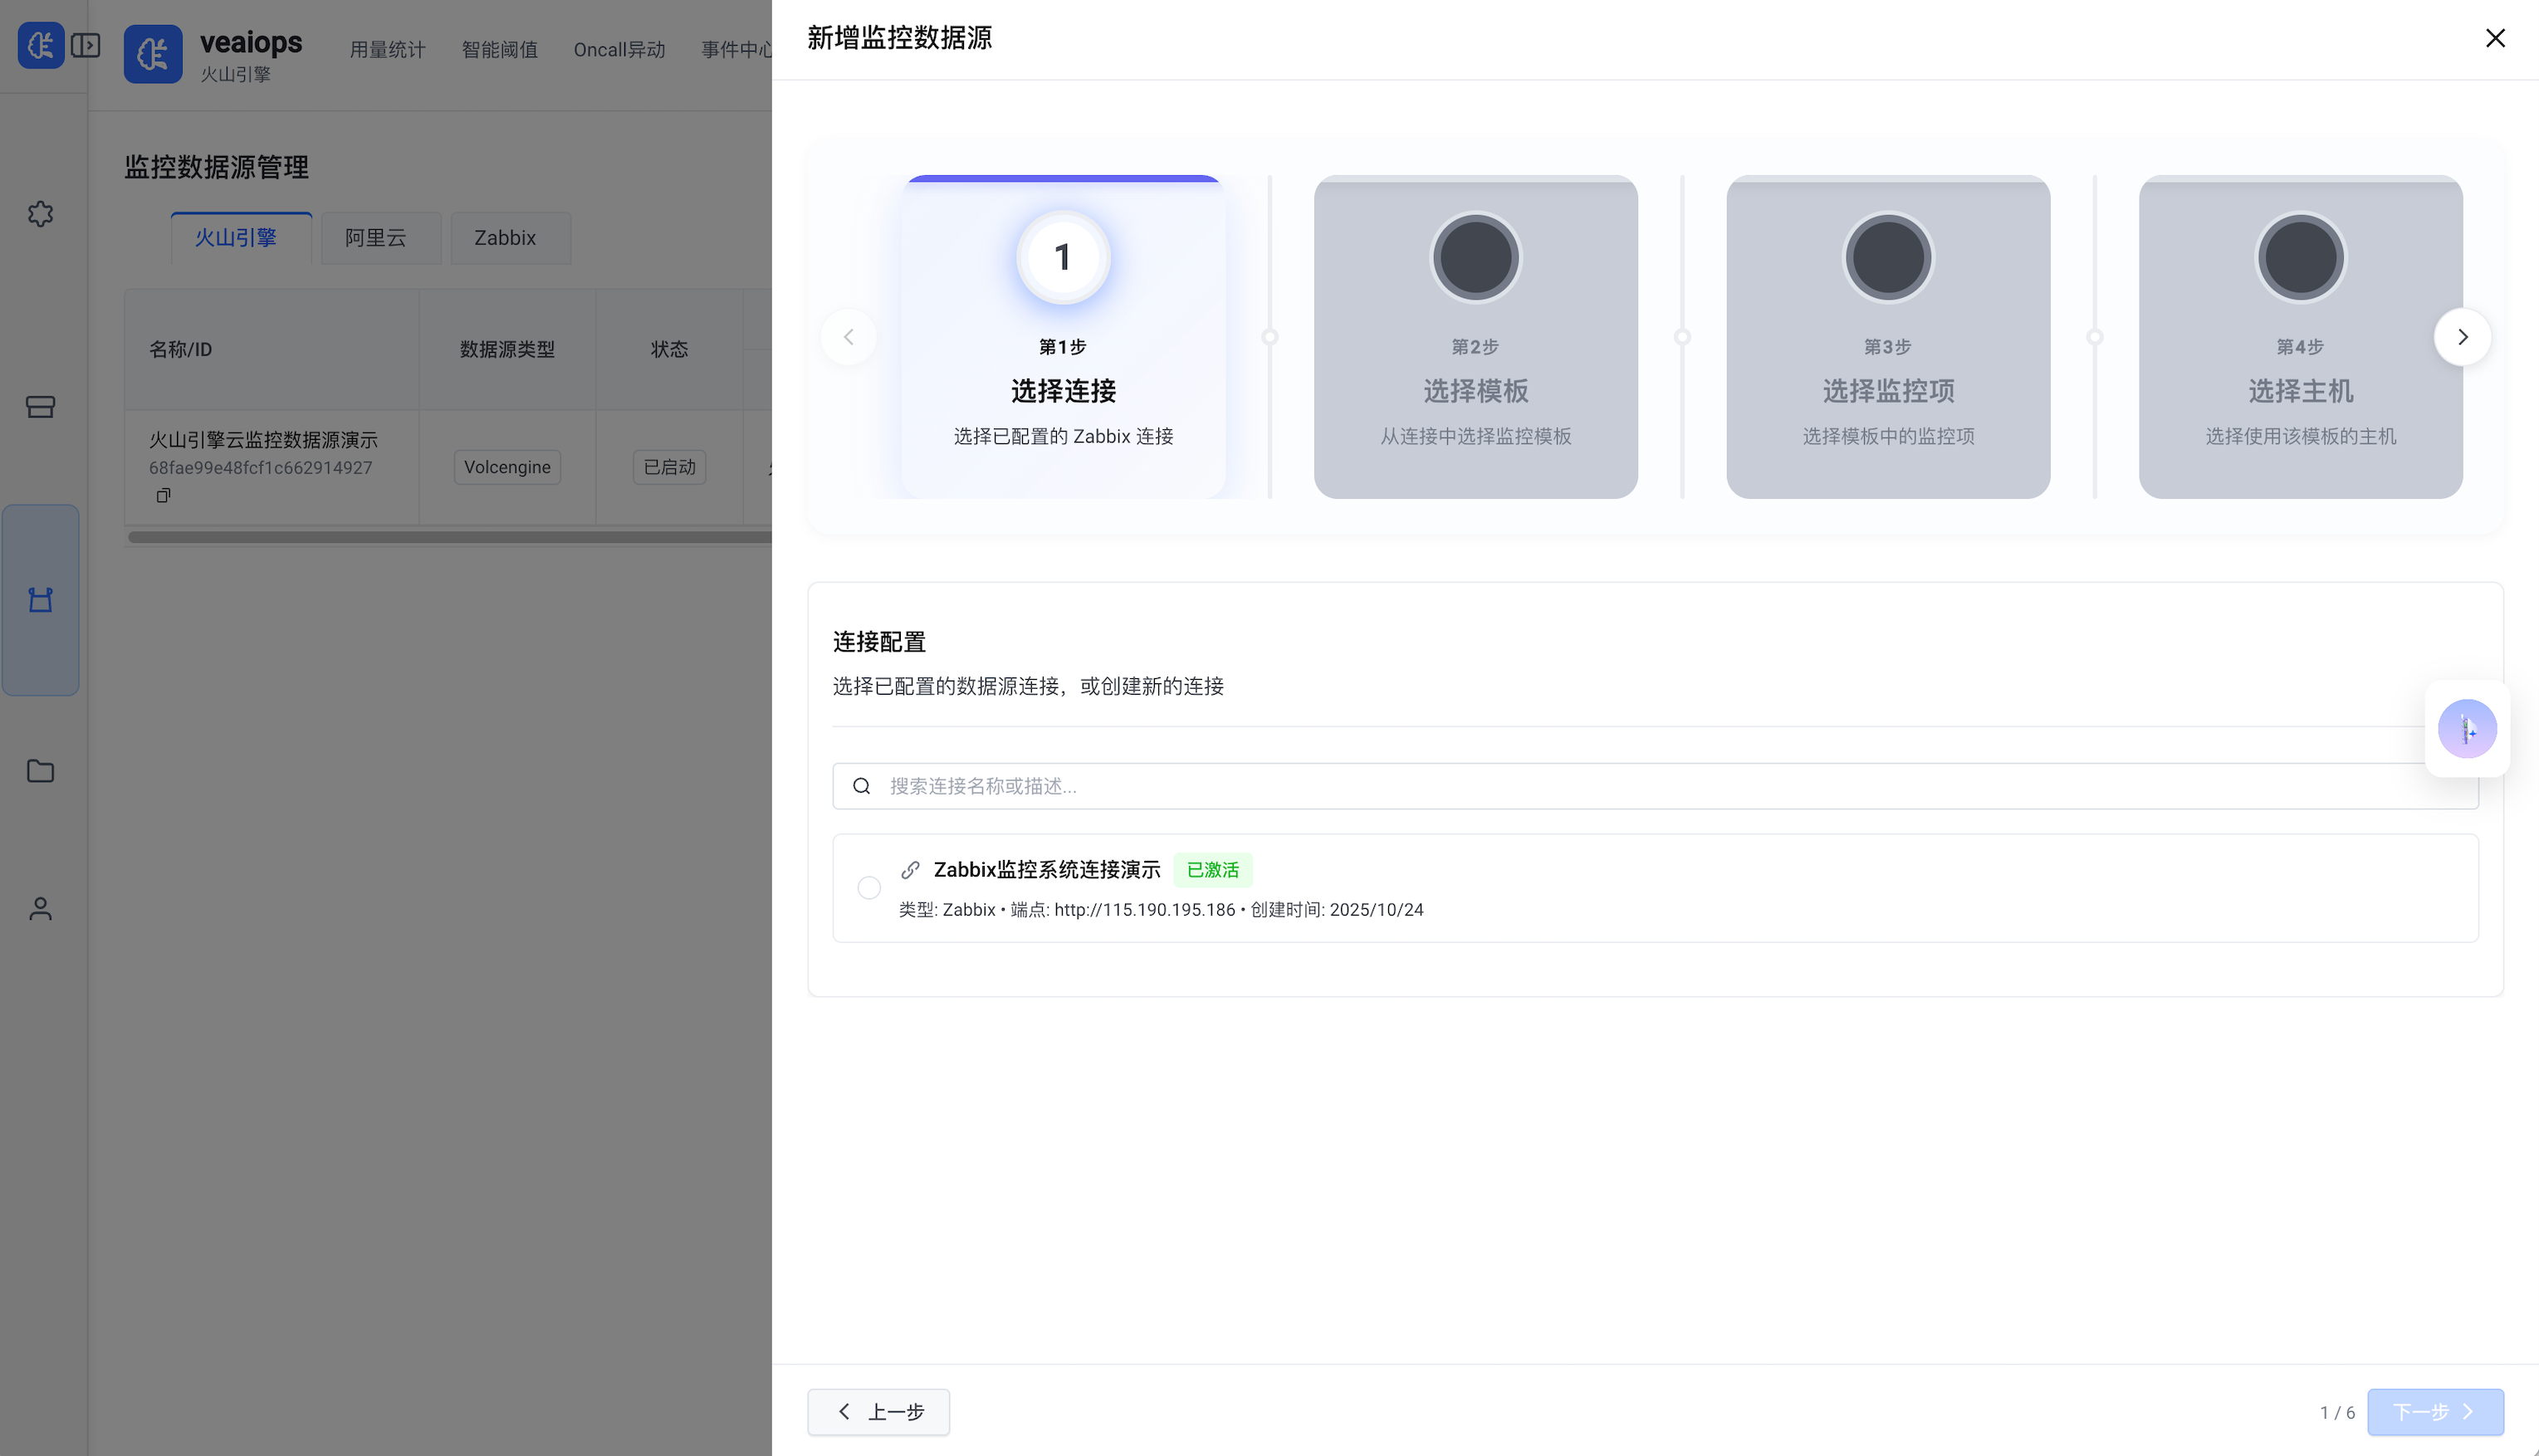
数据源配置向导
不同类型的数据源有专门的配置向导:
火山引擎数据源:
阿里云数据源:
Zabbix 数据源:
下一步学习
Nx Workspace 快速入门
什么是 Nx Workspace?
Nx 是一个智能、快速、可扩展的构建系统,帮助您高效管理 Monorepo。
核心特性:
- ✅ 智能缓存: 只构建变更的部分,显著提升构建速度
- ✅ 依赖图管理: 自动分析和管理包之间的依赖关系
- ✅ 并行执行: 充分利用多核CPU,并行构建和测试
- ✅ 代码生成: 提供代码脚手架,快速创建新模块
常用命令
# 开发
pnpm dev                    # 启动开发服务器
pnpm dev:veaiops            # 启动主应用

# 构建
pnpm build                  # 构建所有包和应用
pnpm build:packages         # 仅构建共享包
pnpm build:apps             # 仅构建应用

# 代码质量
pnpm lint                   # 代码检查
pnpm type-check             # 类型检查
pnpm format                 # 代码格式化

# Nx 工具
pnpm nx graph               # 可视化依赖图
pnpm nx affected:build      # 构建受影响的项目
pnpm nx affected:test       # 测试受影响的项目
pnpm nx reset               # 清除缓存
包引用方式
VeAIOps 通过 tsconfig.base.json 配置了路径别名,可以直接引用共享包:
// 导入组件库
import { CustomTable, Filters, CellRender } from '@veaiops/components';

// 导入 Hooks
import { useTableRefresh } from '@veaiops/hooks';

// 导入类型
import type { DataSource } from '@veaiops/types';

// 导入工具函数
import { formatDate } from '@veaiops/utils';

// 导入常量
import { API_ENDPOINTS } from '@veaiops/constants';
共享包详解
VeAIOps 前端采用 Monorepo 架构,将可复用的代码抽象为共享包。本节详细介绍每个包的作用、内容和使用场景。
@veaiops/components - UI 组件库 ⭐
作用: VeAIOps 核心 UI 组件库,提供可复用的业务组件。
主要组件分类:
CustomTable - 核心表格组件
- 完整的数据源管理
- 分页、排序、筛选
- 插件化架构
- 生命周期钩子
- 刷新机制
import { CustomTable } from '@veaiops/components';

<CustomTable
  dataSource={{ request: fetchData }}
  baseColumns={columns}
/>
Filters - 插件化筛选器
- 动态配置
- 插件扩展
- 命名空间支持
- 预设配置
import { Filters } from '@veaiops/components';

<Filters config={filterConfig} query={query} showReset />
CellRender - 单元格渲染组件集合
InfoWithCode- 信息展示StampTime- 时间格式化Ellipsis- 文本省略CustomOutlineTag- 标签StatusDot- 状态点CopyButton- 复制按钮Boolean- 布尔值显示Duration- 时长显示Link- 链接渲染
import { CellRender } from '@veaiops/components';

<CellRender.InfoWithCode name="名称" code="ID" />
<CellRender.StampTime time={timestamp} />
<CellRender.Ellipsis text={longText} />
Form Control 系列
SelectComponents.Account- 账户选择SelectComponents.Employee- 员工选择SelectComponents.PSM- PSM 服务选择InputComponents.Search- 搜索输入Cascader- 级联选择FormList- 表单列表
import { SelectComponents } from '@veaiops/components';

<SelectComponents.Account
  value={accountId}
  onChange={handleChange}
/>
Button 系列
ButtonGroupRender- 按钮组渲染CopyButton- 复制按钮LoadingButton- 加载按钮PopoverWrapper- 气泡包装器
import { ButtonGroupRender } from '@veaiops/components';

<ButtonGroupRender
  buttonConfigurations={[
    {
      text: '编辑',
      onClick: handleEdit,
      buttonProps: { type: 'text' }
    }
  ]}
/>
- Card - 卡片组件系列
- XGuide - 用户引导组件
- CustomFields - 自定义字段
- Tip - 提示组件
- ConfigDiff - 配置对比
import { Card, XGuide, Tip } from '@veaiops/components';
使用场景:
- ✅ 构建数据管理页面
- ✅ 实现复杂表格交互
- ✅ 创建筛选和搜索功能
- ✅ 渲染统一的 UI 元素
@veaiops/hooks - React Hooks 库
作用: 提供可复用的业务逻辑 Hooks。
主要 Hooks:
| Hook | 作用 | 使用场景 |
|---|---|---|
useTableRefresh | 表格刷新管理 | 需要手动刷新表格数据 |
useApi | API 请求封装 | 统一的 API 调用方式 |
useConfigManager | 配置管理 | 管理页面配置状态 |
示例:
import { useTableRefresh } from '@veaiops/hooks';

const MyComponent = () => {
  const { refreshKey, refresh } = useTableRefresh();

  // 刷新表格
  const handleRefresh = () => {
    refresh();
  };

  return <CustomTable key={refreshKey} />;
};
使用场景:
- ✅ 表格数据刷新
- ✅ 配置状态管理
- ✅ API 请求封装
@veaiops/types - 类型定义库
作用: 提供跨包共享的 TypeScript 类型定义。
主要类型文件:
| 文件 | 包含类型 | 说明 |
|---|---|---|
common.ts | 通用类型 | BaseResponse、Pagination 等 |
alarm.ts | 告警类型 | Alarm、AlarmLevel、AlarmStatus |
monitor.ts | 监控类型 | Monitor、Metric 等 |
form-item.ts | 表单类型 | FormItem、FormConfig |
enum-service.ts | 枚举服务 | 各种枚举类型 |
module.ts | 模块类型 | 模块相关类型定义 |
示例:
import type { BaseResponse, Pagination } from '@veaiops/types';

interface DataSourceResponse extends BaseResponse<DataSource[]> {
  pagination: Pagination;
}
使用场景:
- ✅ 定义通用数据结构
- ✅ 跨包类型共享
- ✅ 保证类型一致性
@veaiops/utils - 工具函数库
作用: 提供通用的工具函数和辅助方法。
主要工具分类:
import { formatDate, formatTime } from '@veaiops/utils';

// 格式化日期
formatDate(new Date()); // "2024-01-01"

// 格式化时间
formatTime(timestamp); // "2024-01-01 12:00:00"
import { formatNumber, formatBytes } from '@veaiops/utils';

// 格式化数字
formatNumber(1234567); // "1,234,567"

// 格式化字节
formatBytes(1024); // "1 KB"
import { apiClient } from '@veaiops/utils';

// GET 请求
const data = await apiClient.get('/api/users');

// POST 请求
await apiClient.post('/api/users', { name: 'John' });
import { parseQuery, stringifyQuery } from '@veaiops/utils';

// 解析查询字符串
parseQuery('?name=john&age=30');
// { name: 'john', age: '30' }

// 构建查询字符串
stringifyQuery({ name: 'john', age: 30 });
// "name=john&age=30"
工具文件:
tools/date.ts- 日期处理tools/format.ts- 格式化工具tools/time.ts- 时间处理tools/query.ts- 查询参数tools/table.ts- 表格工具tools/logger.ts- 日志工具hooks/api-client.ts- API 客户端
使用场景:
- ✅ 日期时间格式化
- ✅ 数据格式化
- ✅ API 请求封装
- ✅ 查询参数处理
@veaiops/constants - 常量定义库
作用: 集中管理应用级常量,保证一致性。
主要常量文件:
// api.ts - API 相关常量
export const API_ENDPOINTS = {
  BOTS: '/apis/v1/manager/system-config/bots/',
  DATASOURCES: '/apis/v1/datasource/',
  EVENTS: '/apis/v1/event-center/',
};

// datasource.ts - 数据源常量
export const DATA_SOURCE_TYPES = {
  ALIYUN: 'Aliyun',
  VOLCENGINE: 'Volcengine',
  ZABBIX: 'Zabbix',
};

// status.ts - 状态常量
export const STATUS = {
  ACTIVE: 'active',
  INACTIVE: 'inactive',
  PENDING: 'pending',
};

// routes.ts - 路由常量
export const ROUTES = {
  SYSTEM: '/system',
  EVENT_CENTER: '/event-center',
  THRESHOLD: '/threshold',
};

// color.ts - 颜色常量
export const COLORS = {
  PRIMARY: '#165DFF',
  SUCCESS: '#00B42A',
  WARNING: '#FF7D00',
  ERROR: '#F53F3F',
};
使用场景:
- ✅ 统一 API 地址
- ✅ 定义业务常量
- ✅ 管理状态枚举
- ✅ 统一路由路径
@veaiops/openapi-specs - API 规范管理 ⭐
作用: 管理 OpenAPI 规范,自动生成前端 API 代码。
目录结构:
openapi-specs/
├── src/
│   ├── specs/
│   │   ├── modules/          # 模块 API 规范
│   │   │   ├── bots.json
│   │   │   ├── datasource.json
│   │   │   ├── event-center.json
│   │   │   └── ...
│   │   ├── main.json         # 主规范
│   │   └── api-config.json   # API 配置
│   └── scripts/
│       ├── generate-api-complete.js    # 完整生成脚本
│       ├── build-openapi.js            # 构建 OpenAPI
│       └── validate-specs.js           # 验证规范
└── package.json
主要功能:
- 定义 API 规范 - 在
modules/下定义各模块的 API - 生成 TypeScript 代码 - 自动生成类型定义和 API 服务类
- 验证规范 - 确保 API 规范的正确性
使用流程:
# 1. 定义 OpenAPI spec
# 编辑 specs/modules/your-module.json

# 2. 生成 API 代码
pnpm generate:api

# 3. 使用生成的代码
import { YourService } from 'api-generate';
使用场景:
- ✅ 定义后端 API 接口
- ✅ 自动生成 TypeScript 类型
- ✅ 自动生成 API 客户端
- ✅ 保证前后端类型一致
@veaiops/theme-ve-o - 主题样式库
作用: 统一的视觉风格和主题变量。
主要内容:
// 主题变量
@primary-color: #165DFF;
@success-color: #00B42A;
@warning-color: #FF7D00;
@error-color: #F53F3F;

// 间距
@spacing-xs: 4px;
@spacing-sm: 8px;
@spacing-md: 16px;
@spacing-lg: 24px;

// 字体大小
@font-size-sm: 12px;
@font-size-base: 14px;
@font-size-lg: 16px;

// 圆角
@border-radius-sm: 2px;
@border-radius-base: 4px;
@border-radius-lg: 8px;
使用方式:
@import '@veaiops/theme-ve-o';

.my-component {
  color: @primary-color;
  padding: @spacing-md;
  border-radius: @border-radius-base;
}
使用场景:
- ✅ 统一视觉风格
- ✅ 主题变量管理
- ✅ 组件样式定制
包依赖关系图
apps/veaiops (主应用)
  ├─ @veaiops/components (UI 组件库)
  │   ├─ @veaiops/constants
  │   └─ @veaiops/types
  ├─ @veaiops/hooks (Hooks 库)
  │   └─ @veaiops/types
  ├─ @veaiops/utils (工具函数)
  │   └─ @veaiops/constants
  ├─ @veaiops/types (类型定义)
  ├─ @veaiops/constants (常量定义)
  └─ @veaiops/theme-ve-o (主题样式)

api-generate (自动生成)
  └─ @veaiops/openapi-specs (生成源)
依赖说明:
- 主应用依赖所有共享包
- 组件库依赖类型和常量包
- Hooks 库依赖类型包
- 工具函数依赖常量包
- OpenAPI specs 生成 API 代码
核心组件使用
VeAIOps 提供了丰富的 UI 组件,帮助您快速构建管理界面。
CustomTable - 核心表格组件
CustomTable 是 VeAIOps 最核心的组件之一,提供了开箱即用的数据管理能力。
基本使用
import { CustomTable } from '@veaiops/components';

const MyTable = () => {
  const columns = [
    { title: '名称', dataIndex: 'name', key: 'name' },
    { title: '状态', dataIndex: 'status', key: 'status' },
  ];

  const dataSource = {
    request: async (params) => {
      const response = await fetchData(params);
      return {
        data: response.data,
        total: response.total,
        success: true,
      };
    },
  };

  return <CustomTable dataSource={dataSource} baseColumns={columns} />;
};
使用 useBusinessTable (推荐)
useBusinessTable 是对 CustomTable 的增强封装,提供了更强大的功能:
import { useBusinessTable } from '@veaiops/components';

const MyTable = ({ onEdit, onDelete }) => {
  const { customTableProps } = useBusinessTable({
    dataSource: { request: fetchData },
    tableProps: { rowKey: 'id' },
    handlers: {
      delete: onDelete,
      update: onEdit,
    },
    refreshConfig: {
      enableRefreshFeedback: true,
      successMessage: '操作成功',
    },
  });

  return <CustomTable {...customTableProps} />;
};
核心特性:
- 🔄 自动分页管理
- ⚡ 智能刷新机制
- 🎯 操作包装器 (支持 loading、错误处理)
- 🔍 筛选集成
- 📊 生命周期钩子
Filters - 筛选器组件
Filters 提供了插件化的筛选功能,支持多种筛选类型。
基本使用
import { Filters } from '@veaiops/components';

const filterConfig = [
  {
    field: 'name',
    label: '名称',
    type: 'Input',
    componentProps: { placeholder: '请输入名称' },
  },
  {
    field: 'status',
    label: '状态',
    type: 'Select',
    componentProps: {
      options: [
        { label: '启用', value: 'active' },
        { label: '禁用', value: 'inactive' },
      ],
    },
  },
  {
    field: 'dateRange',
    label: '日期范围',
    type: 'DateRange',
  },
];

<Filters config={filterConfig} query={query} showReset />;
内置筛选器类型:
Input- 文本输入Select- 下拉选择DateRange- 日期范围Select.Account- 账户选择器 (命名空间格式)Select.Employee- 员工选择器- 更多类型可通过插件扩展...
CellRender - 单元格渲染
提供统一的单元格渲染组件,保持 UI 一致性。
import { CellRender } from '@veaiops/components';

// 信息展示
<CellRender.InfoWithCode name="名称" code="ID-001" />

// 时间戳
<CellRender.StampTime time="2024-01-01T00:00:00Z" />

// 省略文本
<CellRender.Ellipsis text="很长的文本..." />

// 状态标签
<CellRender.CustomOutlineTag>已启用</CellRender.CustomOutlineTag>

// 状态点
<CellRender.StatusDot status="active" />

// 复制按钮
<CellRender.CopyButton text="可复制的文本" />
开发流程
完整开发流程概览
VeAIOps 前端开发遵循以下标准流程:
定义 OpenAPI Spec
在 frontend/packages/openapi-specs/src/specs/modules/ 目录下定义 API 规范。
生成前端 API 代码
运行生成命令,自动生成类型定义和 API 客户端代码。
实现业务逻辑
基于生成的 API 代码,实现业务逻辑和 UI 组件。
测试和调试
确保功能正常,代码质量达标。
API 代码生成
1. 定义 OpenAPI Spec
在 frontend/packages/openapi-specs/src/specs/modules/ 目录下创建 API 规范文件。
示例: prometheus.json
{
  "openapi": "3.0.0",
  "info": {
    "title": "Prometheus API",
    "version": "1.0.0",
    "description": "Prometheus 数据源管理接口"
  },
  "paths": {
    "/apis/v1/datasource/prometheus/": {
      "get": {
        "summary": "Get All Prometheus Datasources",
        "description": "获取所有 Prometheus 数据源",
        "tags": ["Data Sources"],
        "parameters": [
          {
            "name": "skip",
            "in": "query",
            "required": false,
            "schema": {
              "type": "integer",
              "default": 0
            }
          },
          {
            "name": "limit",
            "in": "query",
            "required": false,
            "schema": {
              "type": "integer",
              "default": 100
            }
          }
        ],
        "responses": {
          "200": {
            "description": "Successful Response",
            "content": {
              "application/json": {
                "schema": {
                  "type": "object",
                  "properties": {
                    "items": {
                      "type": "array",
                      "items": {
                        "$ref": "#/components/schemas/PrometheusDataSource"
                      }
                    },
                    "total": {
                      "type": "integer"
                    }
                  }
                }
              }
            }
          }
        }
      },
      "post": {
        "summary": "Create Prometheus Datasource",
        "description": "创建新的 Prometheus 数据源",
        "tags": ["Data Sources"],
        "requestBody": {
          "required": true,
          "content": {
            "application/json": {
              "schema": {
                "$ref": "#/components/schemas/PrometheusDataSourceCreate"
              }
            }
          }
        },
        "responses": {
          "200": {
            "description": "Successful Response",
            "content": {
              "application/json": {
                "schema": {
                  "$ref": "#/components/schemas/PrometheusDataSource"
                }
              }
            }
          }
        }
      }
    }
  },
  "components": {
    "schemas": {
      "PrometheusDataSource": {
        "type": "object",
        "properties": {
          "_id": {
            "type": "string"
          },
          "name": {
            "type": "string"
          },
          "type": {
            "type": "string",
            "enum": ["Prometheus"]
          },
          "prometheus_config": {
            "$ref": "#/components/schemas/PrometheusConfig"
          },
          "created_at": {
            "type": "string",
            "format": "date-time"
          }
        }
      },
      "PrometheusConfig": {
        "type": "object",
        "properties": {
          "server_url": {
            "type": "string"
          },
          "query_timeout": {
            "type": "integer"
          }
        }
      },
      "PrometheusDataSourceCreate": {
        "type": "object",
        "required": ["name", "type", "prometheus_config"],
        "properties": {
          "name": {
            "type": "string"
          },
          "type": {
            "type": "string",
            "enum": ["Prometheus"]
          },
          "prometheus_config": {
            "$ref": "#/components/schemas/PrometheusConfig"
          }
        }
      }
    }
  }
}
2. 生成前端 API 代码
定义好 OpenAPI spec 后,运行生成命令:
cd frontend
pnpm generate:api
此命令会:
- 合并所有 spec 文件
- 生成 TypeScript 类型定义
- 生成 API 服务类
- 输出到
frontend/apps/veaiops/api-generate/目录
生成的代码结构:
frontend/apps/veaiops/api-generate/
├── core/                    # 核心 API 客户端
│   ├── ApiError.ts
│   ├── ApiRequestOptions.ts
│   ├── ApiResult.ts
│   ├── CancelablePromise.ts
│   ├── OpenAPI.ts
│   └── request.ts
├── models/                  # 数据模型(自动生成)
│   ├── PrometheusDataSource.ts
│   ├── PrometheusConfig.ts
│   └── ...
├── services/                # API 服务(自动生成)
│   ├── DataSourcesService.ts
│   └── ...
└── volc-ai-ops-api.ts      # 统一导出
3. 使用生成的 API 代码
生成后,可以直接在代码中使用:
import { DataSourcesService } from 'api-generate';
import type { PrometheusDataSource } from 'api-generate';

// 获取 Prometheus 数据源列表
const response = await DataSourcesService.getAllPrometheusDatasources({
  skip: 0,
  limit: 10,
});

// 创建新数据源
const newDataSource = await DataSourcesService.createPrometheusDatasource({
  requestBody: {
    name: 'My Prometheus',
    type: 'Prometheus',
    prometheus_config: {
      server_url: 'http://prometheus:9090',
      query_timeout: 30,
    },
  },
});
表格配置模式 (推荐)
这是 VeAIOps 推荐的开发模式,将配置、列定义和组件分离,代码更清晰、易维护。
完整示例:机器人管理
参考 VeAIOps 现有的机器人管理实现:
步骤 1: 定义类型
/**
 * 机器人数据结构
 */
export interface Bot {
  _id: string;
  bot_id: string;
  name: string;
  channel: 'Lark' | 'DingTalk' | 'WeCom';
  open_id?: string;
  is_active: boolean;
  created_at: string;
  updated_at: string;
}

/**
 * 创建/更新机器人的表单数据
 */
export interface BotFormData {
  name: string;
  bot_id: string;
  bot_secret: string;
  channel: string;
  // ... 其他字段
}
步骤 2: 配置表格列
import { Button } from '@arco-design/web-react';
import { IconEdit, IconDelete } from '@arco-design/web-react/icon';
import type { ColumnProps } from '@arco-design/web-react/es/Table';
import { CellRender, ButtonGroupRender } from '@veaiops/components';
import type { Bot } from './types';

interface TableColumnsProps {
  onEdit: (bot: Bot) => void;
  onDelete: (botId: string) => void;
}

export const getBotColumns = ({
  onEdit,
  onDelete,
}: TableColumnsProps): ColumnProps<Bot>[] => [
  {
    title: 'App ID',
    dataIndex: 'bot_id',
    key: 'bot_id',
    width: 200,
    ellipsis: true,
  },
  {
    title: '群聊机器人名称',
    dataIndex: 'name',
    key: 'name',
    width: 150,
    render: (name: string, record: Bot) => (
      <CellRender.InfoWithCode name={name} code={record._id} />
    ),
  },
  {
    title: 'Open ID',
    dataIndex: 'open_id',
    key: 'open_id',
    width: 200,
    render: (openId: string) => openId || '-',
  },
  {
    title: '操作',
    key: 'actions',
    width: 120,
    fixed: 'right' as const,
    render: (_: unknown, record: Bot) => (
      <ButtonGroupRender
        buttonConfigurations={[
          {
            text: '编辑',
            visible: true,
            onClick: () => onEdit(record),
            buttonProps: {
              type: 'text',
              size: 'small',
              icon: <IconEdit />,
            },
            tooltip: '编辑配置',
          },
          {
            text: '删除',
            visible: true,
            supportPopConfirm: true,
            popConfirmTitle: '确认删除',
            popConfirmContent: '确定要删除吗?',
            onClick: () => onDelete(record._id!),
            buttonProps: {
              type: 'text',
              size: 'small',
              status: 'danger',
              icon: <IconDelete />,
            },
          },
        ]}
      />
    ),
  },
];
步骤 3: 配置筛选器
import type { FilterConfig } from '@veaiops/components';

export const botFilters: FilterConfig[] = [
  {
    field: 'name',
    label: '机器人名称',
    type: 'Input',
    componentProps: {
      placeholder: '请输入机器人名称',
      allowClear: true,
    },
  },
  {
    field: 'channel',
    label: '渠道类型',
    type: 'Select',
    componentProps: {
      placeholder: '请选择渠道',
      options: [
        { label: '飞书', value: 'Lark' },
        { label: '钉钉', value: 'DingTalk' },
        { label: '企业微信', value: 'WeCom' },
      ],
      allowClear: true,
    },
  },
];
步骤 4: 创建表格配置 Hook
import { useCallback } from 'react';
import { useBusinessTable } from '@veaiops/components';
import { Message } from '@arco-design/web-react';
import { getBots, deleteBot } from '../lib/api';
import { getBotColumns } from '../lib/columns';
import type { Bot } from '../lib/types';

export const useBotTableConfig = ({
  onEdit,
}: {
  onEdit: (bot: Bot) => void;
}) => {
  // API 请求函数
  const request = useCallback(
    async (params: { current: number; pageSize: number; [key: string]: any }) => {
      const { current, pageSize, ...filters } = params;

      const response = await getBots({
        skip: (current - 1) * pageSize,
        limit: pageSize,
        ...filters,
      });

      return {
        data: response.data,
        total: response.total || 0,
        success: true,
      };
    },
    [],
  );

  // 删除处理
  const handleDelete = useCallback(async (id: string) => {
    try {
      await deleteBot(id);
      Message.success('删除成功');
      return true;
    } catch (error) {
      Message.error('删除失败');
      return false;
    }
  }, []);

  // 使用 useBusinessTable
  const { customTableProps } = useBusinessTable({
    dataSource: { request },
    handlers: {
      delete: handleDelete,
    },
    refreshConfig: {
      enableRefreshFeedback: true,
    },
  });

  // 获取列配置
  const columns = useCallback(
    () => getBotColumns({ onEdit, onDelete: handleDelete }),
    [onEdit, handleDelete],
  );

  return {
    ...customTableProps,
    handleColumns: columns,
  };
};
步骤 5: 创建业务逻辑 Hook
import { useState, useCallback } from 'react';
import { Form, Message } from '@arco-design/web-react';
import { createBot, updateBot } from '../lib/api';
import type { Bot, BotFormData } from '../lib/types';

export const useBotLogic = (refreshTable?: () => void) => {
  const [form] = Form.useForm();
  const [modalVisible, setModalVisible] = useState(false);
  const [editingBot, setEditingBot] = useState<Bot | null>(null);
  const [loading, setLoading] = useState(false);

  // 打开新增弹窗
  const handleAdd = useCallback(() => {
    setEditingBot(null);
    form.resetFields();
    setModalVisible(true);
  }, [form]);

  // 打开编辑弹窗
  const handleEdit = useCallback(
    (bot: Bot) => {
      setEditingBot(bot);
      form.setFieldsValue(bot);
      setModalVisible(true);
    },
    [form],
  );

  // 关闭弹窗
  const handleCancel = useCallback(() => {
    setModalVisible(false);
    setEditingBot(null);
    form.resetFields();
  }, [form]);

  // 提交表单
  const handleSubmit = useCallback(
    async (values: BotFormData) => {
      setLoading(true);
      try {
        if (editingBot) {
          await updateBot(editingBot._id, values);
          Message.success('更新成功');
        } else {
          await createBot(values);
          Message.success('创建成功');
        }
        handleCancel();
        refreshTable?.();
      } catch (error) {
        Message.error(editingBot ? '更新失败' : '创建失败');
      } finally {
        setLoading(false);
      }
    },
    [editingBot, handleCancel, refreshTable],
  );

  return {
    modalVisible,
    editingBot,
    form,
    loading,
    handleAdd,
    handleEdit,
    handleCancel,
    handleSubmit,
  };
};
步骤 6: 创建 UI 组件
import { forwardRef } from 'react';
import { CustomTable, Filters } from '@veaiops/components';
import { Button, Card } from '@arco-design/web-react';
import { IconPlus } from '@arco-design/web-react/icon';
import { useBotTableConfig } from '../hooks';
import { botFilters } from '../lib/filters';
import type { Bot } from '../lib/types';

interface BotTableProps {
  onEdit: (bot: Bot) => void;
  onAdd: () => void;
}

export const BotTable = forwardRef<any, BotTableProps>((props, ref) => {
  const { onEdit, onAdd } = props;

  const tableConfig = useBotTableConfig({ onEdit });

  return (
    <Card
      title="群聊机器人管理"
      extra={
        <Button type="primary" icon={<IconPlus />} onClick={onAdd}>
          新建机器人
        </Button>
      }
    >
      <Filters config={botFilters} showReset />
      <CustomTable {...tableConfig} ref={ref} rowKey="_id" />
    </Card>
  );
});

BotTable.displayName = 'BotTable';
import { useRef } from 'react';
import { BotTable } from './bot-table';
import { BotModal } from './bot-modal';
import { useBotLogic } from '../hooks';

export const BotManagement = () => {
  const tableRef = useRef<any>(null);

  const {
    modalVisible,
    editingBot,
    form,
    loading,
    handleAdd,
    handleEdit,
    handleCancel,
    handleSubmit,
  } = useBotLogic(() => tableRef.current?.refresh());

  return (
    <>
      <BotTable ref={tableRef} onAdd={handleAdd} onEdit={handleEdit} />
      <BotModal
        visible={modalVisible}
        form={form}
        loading={loading}
        isEdit={!!editingBot}
        onCancel={handleCancel}
        onSubmit={handleSubmit}
      />
    </>
  );
};

export default BotManagement;
扩展 Filters 插件
Filters 组件采用插件化架构,可以轻松扩展新的筛选类型。
创建自定义筛选器插件
假设我们需要创建一个 PromQL 查询筛选器:
import { Input, Button } from '@arco-design/web-react';
import type { FilterPlugin } from '../../types';

/**
 * PromQL 查询筛选器插件
 */
export const PromQLPlugin: FilterPlugin = {
  type: 'PromQL',
  name: 'PromQL 查询',

  render: ({ hijackedProps, context }) => {
    const handleQuery = () => {
      // 执行查询逻辑
      console.log('PromQL Query:', hijackedProps.value);
    };

    return (
      <Input
        {...hijackedProps}
        placeholder="输入 PromQL 查询语句"
        addAfter={
          <Button type="primary" onClick={handleQuery}>
            查询
          </Button>
        }
      />
    );
  },

  validateConfig: (config) => typeof config === 'object',
};

// 注册插件
import { filterPluginRegistry } from '../../registry';
filterPluginRegistry.register(PromQLPlugin);
使用自定义筛选器
const filterConfig = [
  {
    field: 'promql',
    label: 'PromQL 查询',
    type: 'PromQL',
    componentProps: {
      placeholder: 'rate(http_requests_total[5m])',
    },
  },
];

<Filters config={filterConfig} query={query} />;
扩展现有插件
您也可以扩展现有的 Select 插件,添加新的命名空间类型:
// 在 Select 插件中添加新的命名空间支持
if (config.type === 'Select.Prometheus') {
  return <PrometheusDataSourceSelect {...hijackedProps} />;
}
最佳实践
代码组织
遵循统一的目录结构
所有功能特性都应遵循 features/[feature-name]/{hooks,lib,ui,types} 的目录结构。
关注点分离
hooks/- 业务逻辑lib/- 工具、类型、配置ui/- UI 组件types/- 类型定义
统一导出
每个目录都应该有 index.ts 文件进行统一导出。
类型安全
// ✅ 推荐:完整的类型定义
interface DataSource {
  _id: string;
  name: string;
  type: DataSourceType;
  is_active: boolean;
}

// ✅ 使用枚举
enum DataSourceType {
  Prometheus = 'Prometheus',
  Aliyun = 'Aliyun',
  Volcengine = 'Volcengine',
}

// ❌ 避免:使用 any
const data: any = {};
性能优化
// ✅ 使用 useMemo 缓存配置
const filterConfig = useMemo(() => prometheusFilters, []);

// ✅ 使用 useCallback 缓存函数
const handleEdit = useCallback((record) => {
  // ...
}, []);

// ✅ 使用 React.memo 缓存组件
const MemoizedComponent = React.memo(MyComponent);
错误处理
// ✅ 完善的错误处理
const fetchData = async () => {
  try {
    const response = await api.getData();
    return response.data;
  } catch (error) {
    console.error('Failed to fetch data:', error);
    Message.error('数据加载失败');
    throw error;
  }
};
测试
// 为组件编写测试
describe('PrometheusManagement', () => {
  it('should render correctly', () => {
    render(<PrometheusManagement />);
    expect(screen.getByText('Prometheus 数据源管理')).toBeInTheDocument();
  });

  it('should handle create action', () => {
    const { getByText } = render(<PrometheusManagement />);
    fireEvent.click(getByText('新增数据源'));
    expect(screen.getByText('新增 Prometheus 数据源')).toBeInTheDocument();
  });
});
常见问题
Q: 如何启动开发环境?
cd frontend
pnpm install
pnpm dev
浏览器访问 http://localhost:8080
Q: 如何解决包引用问题?
确保在 tsconfig.base.json 中配置了路径别名:
{
  "compilerOptions": {
    "paths": {
      "@veaiops/components": ["packages/components/src/index.ts"]
    }
  }
}
Q: 如何清除缓存?
pnpm nx reset
pnpm clean:cache
Q: 组件应该放在哪里?
- 通用组件 →
packages/components/src/- 可在多个应用中复用
- 与业务逻辑无关
- 业务组件 →
apps/veaiops/src/modules/[module]/features/[feature]/ui/- 特定业务场景使用
- 包含业务逻辑
Q: 如何处理样式?
使用 CSS Modules:
import styles from './index.module.less';

<div className={styles.container}>
  {/* ... */}
</div>
使用主题变量:
@import '@veaiops/theme-ve-o';

.container {
  color: @primary-color;
  padding: @spacing-md;
}
Q: 如何调试?
- 使用浏览器开发者工具 (F12)
- 使用 React DevTools 扩展
- 使用
console.log或debugger断点 - 查看 Network 面板检查 API 请求
Q: 表格不显示数据?
检查以下几点:
- API 返回的数据格式是否正确
dataSource.request函数是否正确返回{ data, total, success }rowKey是否设置正确- 查看浏览器控制台是否有错误信息
Q: 如何实现表格刷新?
const tableRef = useRef<any>(null);

// 手动刷新
tableRef.current?.refresh();

// 在 useBusinessTable 中配置自动刷新
const { customTableProps } = useBusinessTable({
  dataSource,
  refreshConfig: {
    enableRefreshFeedback: true,
  },
});
Q: 如何自定义表格列?
const columns = [
  {
    title: '自定义列',
    key: 'custom',
    render: (_, record) => (
      <div>
        {/* 自定义渲染 */}
      </div>
    ),
  },
];
Q: 如何构建生产版本?
# 构建所有包
pnpm build:packages

# 构建应用
pnpm build:apps
Q: 如何优化构建速度?
- 利用 Nx 的缓存机制
- 只构建受影响的项目:
pnpm nx affected:build - 使用并行构建
- 定期清理缓存:
pnpm nx reset
Q: 构建失败怎么办?
- 检查 TypeScript 类型错误:
pnpm type-check - 检查代码规范:
pnpm lint - 清除缓存重新构建
- 查看构建日志中的错误信息
参考资源
官方文档
示例代码
参考项目中的现有实现:
- 机器人管理:
frontend/apps/veaiops/src/modules/system/features/bot/ - 数据源管理:
frontend/apps/veaiops/src/modules/system/features/datasource/ - 账户管理:
frontend/apps/veaiops/src/modules/system/features/account/ - 事件中心:
frontend/apps/veaiops/src/modules/event-center/
相关技术栈
| 技术 | 版本 | 说明 |
|---|---|---|
| React | 18+ | UI 框架 |
| TypeScript | 5+ | 类型系统 |
| Modern.js | 最新 | Web 框架 |
| Nx | 17+ | Monorepo 管理 |
| pnpm | 8+ | 包管理器 |
| Arco Design | 最新 | UI 组件库 |
| Less | 最新 | CSS 预处理器 |
学习路径
初学者
- 熟悉 Nx Workspace 基本概念
- 学习 CustomTable 的基础使用
- 尝试修改现有模块
进阶开发者
- 掌握表格配置模式
- 学习 Filters 插件扩展
- 创建新的功能模块
高级开发者
- 扩展 Components 包
- 优化性能和架构
- 贡献核心组件和工具
总结
本文档详细介绍了 VeAIOps 前端 UI 扩展开发的完整流程,包括:
- ✅ Nx Workspace 架构和使用
- ✅ 模块化开发规范
- ✅ CustomTable 和 Filters 组件使用
- ✅ 完整的实战案例 (Prometheus 数据源)
- ✅ 最佳实践和常见问题
遵循本指南,您可以快速高效地扩展 VeAIOps 的 UI 功能。如有任何问题,请参考示例代码或联系开发团队。